Is your Wi-Fi network still going slow even after our first bunch of tips? Are you even experiencing occasional drop-outs and disconnects?
In part two of our Wi-Fi optimization series, we’ll show you how to boost the signal strength of your Wi-Fi network even further. If you missed part one, go check it out!
Set up a wireless repeater
If your property has thick walls or is so large that your router cannot simply broadcast a good signal from one end to the other, it’s probably wise to get a wireless repeater:
These look very similar to a router and pick up your Wi-Fi signal and rebroadcast it with renewed strength. The repeater connects to your wireless router as a regular client, getting an IP address over DHCP much like your regular laptop or PC.
- Position: I suggest following our first tip of part 1 of this guide to determine weak spots of your wireless router. Place the repeater close to this spot but make sure that it’s able to pick up a good signal (80% or more) from your main router. Otherwise it won’t be able to repeat a good quality signal.
- Hardware: When choosing a repeater, don’t be confused by the different names – some companies tend to name their repeaters as ‘Range extenders’ while others call them ‘Wi-Fi expanders’ or something similar. They are all the same. Simply make sure to pick one that rebroadcasts your 802.11n or ac signal and make sure that it’s compatible.
- Set up: Every manufacturer has different setup procedures but in general all that is needed is your network name and password.
Tip: Check out these resources for a general overview or this huge guide on how to use your router as a universal wireless repeater.
Optimize the Wi-Fi settings
There are many complicated settings on your router which can help you optimize the signal in your home. Unfortunately, every manufacturer offers different options under a different name, so we’ll just give a handful of hints that explain where to look and what to look for. Also there are some settings that you should check to see if they are set at their default values:
- 5 Ghz Wireless Mode: If your router and adapter uses it, I’d recommend setting up a 5 Ghz Wi-Fi network instead of the regular 2.4 Ghz. Devices that support this mode are known as ‘Dual-band’.
Since most Wi-Fi routers communicate at a frequency of 2.4 Ghz, using the less common 5 Ghz mode might give you a better throughput.
To enable a 5 GHz connection, go to your router configuration page (normally shown on the device) and find your wireless settings. If you can see an option for a 5 GHz connection, enable it!
- RTS Threshold: RTS stands for ‘Request to send’ and is send by the client to the access point – it essentially asks for permission to send the next data packet. The lower the threshold, the more stable your Wi-Fi network, since it essentially asks more often when sending packages. However, if you don’t have problems with your Wi-Fi you should make sure that the RTS Threshold is set to the maximum allowed:
To do this, go to your router configuration and try to find the ‘RTS Threshold value’ in the wireless settings and set it to 2347. Lower this value only if you are experiencing problems with your network (drop outs etc).
- Fragmentation Threshold: This value is used to set the maximum size of packet a client can send. Smaller packets improve reliability, but they will decrease performance. Unless you’re facing problems with an unreliable network, reducing the fragmentation threshold is not recommended. Make sure it is set to the default settings (usually 2346).
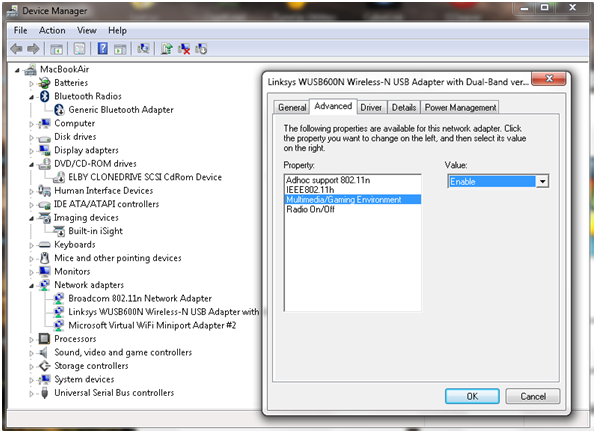
- Enable Multimedia/Gaming settings: Some wireless adapters can either be configured either for regular use or for gaming/multimedia. If you’re streaming video or playing games, enabling this will make sure that network packets for these are prioritised! In other words: If you’re watching a video file over your network, the video will get most of the traffic.
Benchmark and diagnose your Wi-Fi
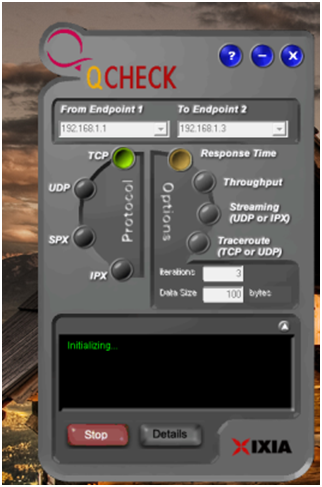
This tip is not an optimization technique per se but it’s a great way to determine if our tips so far have had a positive effect on your network. Free ‘QCheck’ is a great tool that will show you the response time, throughput and streaming performance of your wireless setup. You can easily get it from this website after you filled out a short form.
Enter your IP address under ‘Endpoint 1’ and another IP address in your network under ‘Endpoint 2’ to test the speed. This will give you important information when trying to optimize your Wi-Fi with our tips.
Replace your antenna!
Some router manufacturers sell external antennae that are much stronger than the router’s built-in antenna. If your signal is weak in places (and all our other tips have failed), then you’ll need to check if your manufacturer sells either omnidirectional or directional antennae:
- Omnidirectional: Sends out a signal into all directions. By default, most built-in antennas are omnidirectional. If an omnidirectional antenna is your choice, make sure to look out for a longer one with ‘high gain’.
- Directional antenna: This kind of antenna sends a good wireless signal in a certain direction instead of spreading it in all directions, improving the performance in the target area. It’s like pointing a flashlight in a certain direction instead of using your regular ceiling lamps!
To connect a new antenna, you’ll usually use the SMA connector or MMCX. For more on wireless antennae, I can highly recommend the ‘Do-It-Yourself Wireless Antenna Update’ website by BinaryWolf. You’ll find great how-to guides and hardware recommendations that’ll help you pick the best antenna and the right setup!
That’s it! Using these tips and tricks will definitely improve your Wi-Fi performance and experience – if you’ve got another tip that you use to boost your wireless network let us know!


