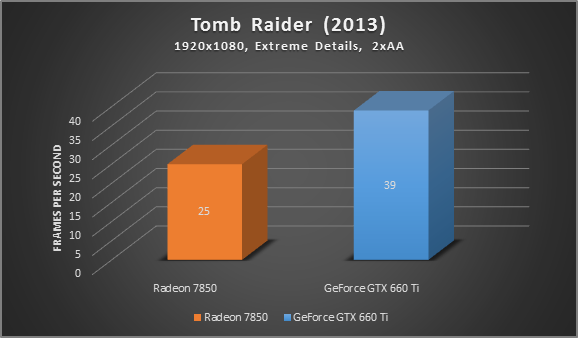
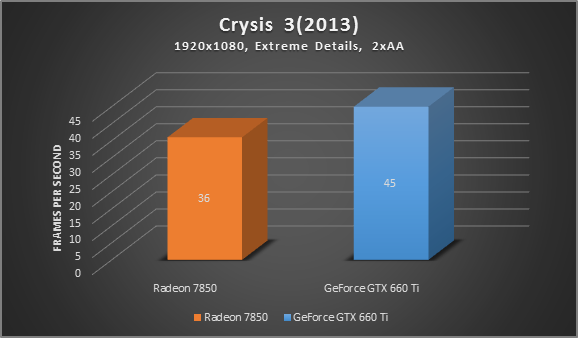
* Tests were performance on a 2012 Alienware X51 Gaming PC: Core i7 3.4 GHz, 8 GB RAM, GeForce GTX 660 TI
As you can see, upgrading from the older 7850 to the GTX 660 TI brought an increase of about 25-50% in Crysis 3 and Tomb Raider. That’s probably still the most effective way to boost performance.
#5 – Upgrade to an SSD
SSDs are much faster than mechanical hard disks and while this most certainly doesn’t boost your game’s frame rate, it will definitely reduce load time in game.
My recommendation is to go at least with an SSD with more than 250 GB as most games these days take up between 8-20 Gigabytes. My Steam folder, for example, clocks in at a massive 60 Gigabyte and all I bought was Age of Empires III, Bioshock 1-3, Far Cry 3, Tomb Raider and Crysis 3. Add to that Windows (another 30 GB), your personal data and some applications. You’re approaching the 256 GB quickly.
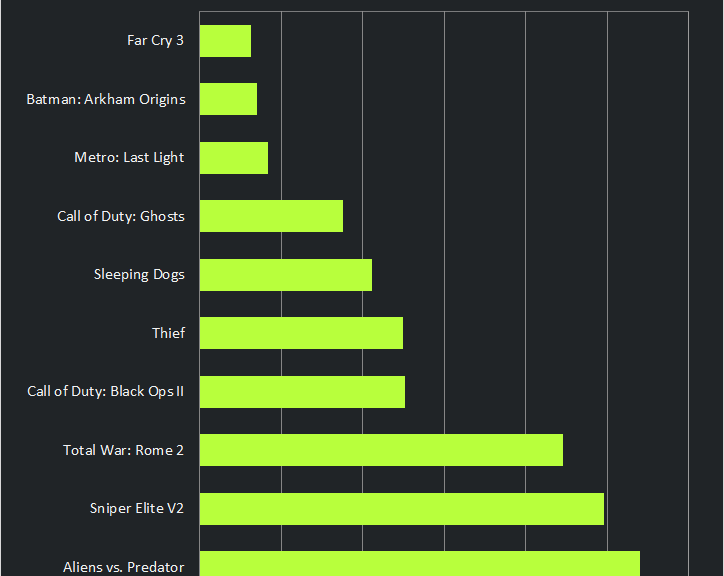
I tried the Samsung 840 which offers a fantastic value (250 GB for 139$). However, I went for the 480 GB SanDisk 480 GB Extreme which boosts an incredible 540 MB/s of sequential read and 460 MB/s of sequential write, for my Alienware X51 gaming rig which – before – featured a stock 7200rpm drive. The performance difference is mindboggling:
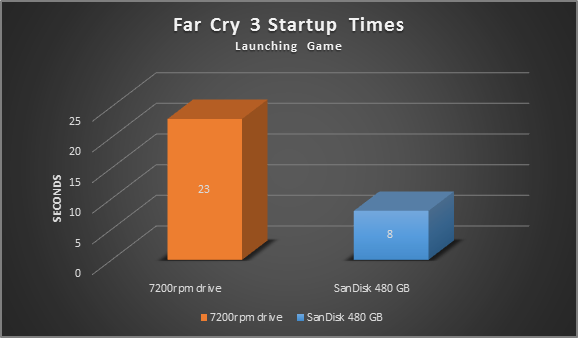
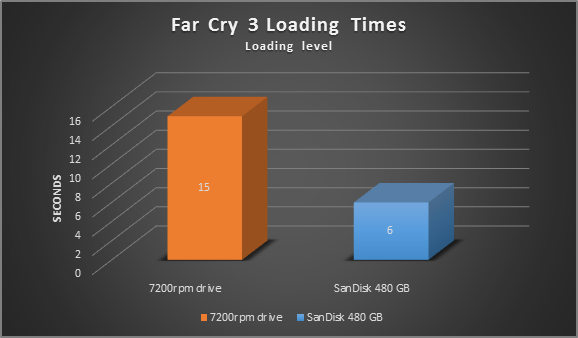
As you can see it has slashed my load times, meaning I spent more time playing and less time waiting!
#6 – Disable SuperFetch and Prefetch
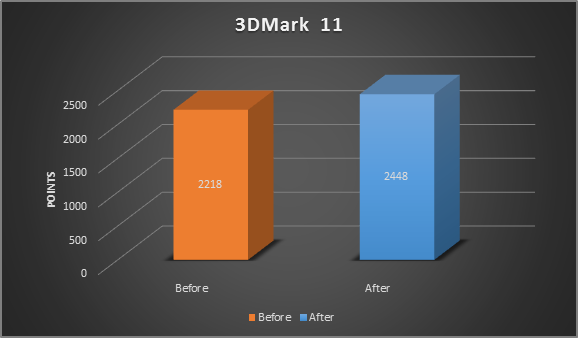
Both SuperFetch and Prefetch are Windows features that are supposed to boost Windows and applications startup times. For games, however, I noticed that loading times and background activity actually increases when these features are enabled. That’s why I recommend turning them both off if you’re an avid gamer. Here’s how:
To do this, go to “Control Panel”, “System and Security”, “Administrative Tools”, and “Services”. Scroll down until you see the “SuperFetch” entry, double-click on it, and choose “Disabled” from the list.

Hit “OK” and close all windows. Next, open up the registry; click on the Start orb and type in “regedit”. Hit Enter, and go to “HKEY_LOCAL_MACHINESYSTEMCurrentControlSetControlSession ManagerMemory ManagementPrefetchParameters”. Double-click on “EnablePrefetcher” and enter “0” (default value is “3”) to disable the Prefetcher.
Note: Please follow the above instructions precisely as deleting or changing the wrong values in the registry may cause problems with your PC.
# 7 – Defrag or TRIM Your Disk
As data is written or deleted from your hard disk, files become fragmented and will physically spread out all over the disk drive. This will lead to a significant performance hit, especially with games, as the hard disk will first need to collect all of these portions in order to be able to fully process the entire file. As both your games and their files usually take up several GBs, it is vital that all of these files can be read in a continuous manner.
1. To defrag the disk, fire up the Start menu, and go to “All Programs”, “Accessories”, “System Tools” and “Disk Defragmenter”.
2. Select your Windows disk, and hit “Defragment disk”. Note, if you have an SSD, you should not defrag. Instead, use the TRIM command to optimize them.
3. In Windows 8, Microsoft integrated the TRIM command into the Disk Defragmenter—so, simply hit “Optimize”. Windows 7 doesn’t offer this, so be sure the TRIM command gets executed regularly. To see if TRIM is enabled, open up a command prompt by clicking on the Start orb and typing “cmd” into the search bar. Right-click on the first result (“cmd”), and click “Run as administrator”. Next, type in the command “Fsutil behavior query disabledeletenotify”, and hit Enter. If this returns the result “= 0″, you’re good to go! Otherwise, TRIM isn’t supported and needs to be enabled. Try entering the command “fsutil behavior set DisableDeleteNotify 0″. If that doesn’t help, a firmware upgrade might be necessary to enable TRIM.
#8 Tweaking the NVIDIA Control Panel
All NVIDIA drivers come with their own control panels that let you tweak the most essential 3D settings. While you can set many of the following options in-game, some are not available or directly controlled by the driver. This is why it’s always a good idea to go through the list of all options and tweak them to best balance performance and visual quality.
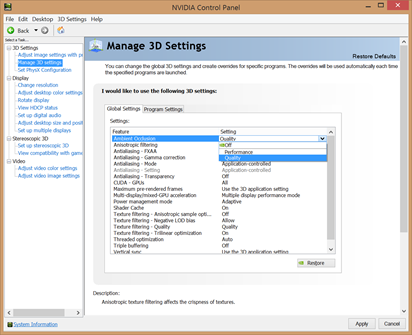
To get to the NVIDIA Control Panel, right-click on your desktop, select “NVIDIA Control Panel” and head over to the “Manage 3D Settings” category on the left. These are the some of the lesser known but still important settings to tweak:
• Maximum Pre-Rendered Frames: This controls the number of frames that the processor prepares before transferring them to the graphics card. Increasing this value results in smoother game play, but you may notice a lag when using the mouse and keyboard. To eliminate the lag, try the “1″ setting.
• Threaded Optimization: This option should always be “On”, as it allows the support of multi-threaded optimization for modern multi-core processors.
• VSync: It synchronizes the frames that your graphics card renders with the refresh rate of your monitor. If you disable it, you might find that games run more smoothly; however, you will notice that some parts of the screen might not be rendered correctly and appear to lag. Disable it only if your monitor has a higher frame rate than your gameplay.
#9 Tweaking the AMD/ATI Control Center
The AMD/ATI Control Center is another fantastic way to squeeze out more performance and increase the visual quality of your games. To fire it up, right-click on your desktop, select “Catalyst Control Center” and head over to the “3D Application Settings” on the left.
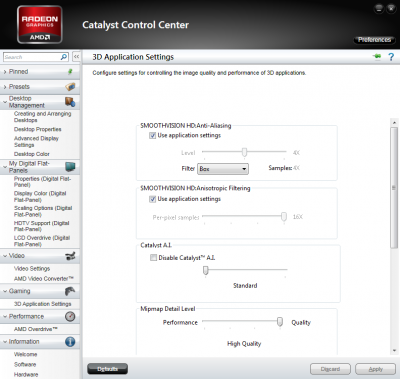
These are the most important settings:
• SMOOTHVISION HD: Anisotropic Filtering: The higher this setting is set, the sharper distant textures will appear. However, this will also increase the processing load on your graphics card. If your GPU is powerful enough, enable it and see if there is a noticeable visual difference.
• Mipmap Detail Level: It determines texture quality. You can choose between “High Quality” (which equals the original texture quality) and “High Performance” (which omits many details and thus produces a higher frame rate). I found that having “High Performance” makes games look blurrier. If your GPU is powerful enough, make sure to set it to “High Quality”.
• Wait for Vertical Refresh: Vertical Sync (or Vsync) synchronizes the frames that your graphic card renders with the refresh rate of your monitor. If you disable Vsync, you might find that games run more smoothly, however, in most cases, you will notice that some parts of the screen might not be rendered correctly and appear to lag. Disable Vsync only if your monitor has a higher framerate (for example 60hz) than your gameplay (for example 40 FPS).
You can achieve the right balance of performance and visual quality with nearly all of the settings described above. There is no right way to configure your ATI Control Center—it depends on what games you play and the power of your ATI graphics card. If you have a relatively new graphics card but play games that are a couple of years old, we recommend adjusting all of the options to the maximum settings (except Mipmap).
Conclusion
Now that we’ve explored 8 critical tweaks to improve gaming performance, what kind of an effect can you expect? Well, it depends on the hardware you’re using. If you’re running on an older laptop or PC that wasn’t meant for gaming at all, our tips can very well mean the difference between stuttering and smooth gameplay.
But even on faster PCs or laptops and gaming rigs, things will feel faster and loading times will decrease when you’re playing games.
Followed most or all of our advice? Now it’s time to dig deep into the upcoming blockbuster titles to make sure they run great from the get-go.