Tag Archives: Apple

Thunderstrike 2 – the first virus for Mac

It seemed like this moment would never come and many times we were assured that there was no threat of a virus for Mac users… but Thunderstrike 2 has arrived and swiftly refuted those claims.

This worm was designed by two IT security experts, Xeno Kovah and Trammell Hudson, after noticing a security breach a few months ago. As reported in Wired, they found that various known weaknesses that affect firmware in all the main PC manufacturers could also be used against MAC.

The infection is able to be transmitted through email phishing, by USB o by an Ethernet port, without being detected.

According to its creators, this is how Thunderstrike 2 works:

The post Thunderstrike 2 – the first virus for Mac appeared first on MediaCenter Panda Security.

Thunderstrike 2 OS X Firmware Attack Self-Replicates to Peripherals

At Black Hat, researchers are expected to disclose new firmware attacks that work against OS X and self replicated to Thunderbolt peripherals.

Writing Advanced OS X Malware an ‘Elegant’ Solution to Improving Detection

OS X security researcher Patrick Wardle is expected at Black Hat to demonstrate how to write advanced Mac malware, including Gatekeeper and Xprotect bypasses, in hopes of raising awareness to the current state of OS malware detection.

How iOS users can stay protected against iScam threat

iScam displays a "crash report" to affected users. (Photo via Daily Mail)

iScam displays a “crash report” to affected users. (Photo via Daily Mail)

It’s a common belief (and myth) that Apple products are invincible against malware. This false line of thinking has recently again been refuted, as iPhone and iPad users have been encountering a ransomware threat that freezes their Internet browsers, rendering their devices unusable. The ploy, commonly known as iScam, urges victims to call a number and pay $80 as a ransom to fix their device. When users visit an infected page while browsing using the Safari application, a message is displayed saying that the device’s iOS has crashed “due to a third party application” in their phone. The users are then directed to contact customer support to fix the issue.

How to clean your system if you’ve been infected by iScam

  • Turn on Anti-phishing. This can be done by visiting Settings > Safari and turn on ‘Fraudulent Website Warning’. When turned on, Safari’s Anti-phishing feature will notify you if you visit a suspected phishing site.
  • Block cookies. For iOS 8 users, tap Settings > Safari > Block Cookies and choose Always Allow, Allow from websites I visit, Allow from Current Websites Only, or Always Block. In iOS 7 or earlier, choose Never, From third parties and advertisers, or Always.
  • Allow JavaScript. Tap Settings > Safari > Advanced and turn JavaScript on.
  • Clear your history and cookies from Safari. In iOS 8, tap Settings > Safari > Clear History and Website Data. In iOS 7 or earlier, tap Clear History and tap Clear Cookies and Data. To clear other stored information from Safari, tap Settings > Safari > Advanced > Website Data > Remove All Website Data.

Check out Apple’s support forum for additional tips on how to keep your device safe while using Safari.

Widespread iScam ransomware originates from US servers

iPhone and iPad users who turn on Avast SecureLine VPN while on unsecured Wi-Fi are protected from iScam.

It’s a common belief (and myth) that Apple products are invincible against malware. This false line of thinking has recently again been refuted, as iPhone and iPad users have been encountering a ransomware threat that freezes their Internet browsers, rendering their devices unusable. The ploy, commonly known as iScam, urges victims to call a number and pay $80 as a ransom to fix their device. When users visit an infected page while browsing using the Safari application, a message is displayed saying that the device’s iOS has crashed “due to a third party application” in their phone. The users are then directed to contact customer support to fix the issue.

iScam displays a "crash report" to affected users. (Photo via Daily Mail)

iScam displays a “crash report” to affected users. (Photo via Daily Mail)

In the midst of this vexing threat, Avast’s suite of security applications identifies URLs which contain malicious content. When discovered, these addresses are flagged for malware and then stored in our blacklist database.

While scanning for malicious URLs, we discovered that many of the servers related to iScam are located in the United States. While iScam has affected users located in both the U.S. and U.K., the origins of the threat have remained fairly nebulous up until this point. Here are a few examples of where we’ve discovered malicious servers in the U.S.:

  • Scottsdale, Arizona (system-logs.info)
  • Concord, North Carolina (pcassists.info)
  • Kirkland, Washington (Adbirdie.com)
  • Chicago, Illinois (pcsafe.us)
  • Los Angeles, California (clevervc.com)

Every cloud has a silver lining – in this case, you can celebrate the fact that you’re protected from iScam using Avast SecureLine VPN. Not only does Avast SecureLine VPN protect you while browsing on unprotected Wi-Fi networks, but it also scans websites to check for malicious content and keep you from becoming affected by them. Once Avast SecureLine VPN is installed onto your iPhone or iPad, it automatically notifies you of the risks of connecting to unsecured Wi-Fi and you have the option of connecting to the secure VPN. Once turned on, Avast SecureLine VPN creates a private ‘tunnel’ for your data to travel through, and all your activities done over the Internet – inbound and outbound through the tunnel — are encrypted. If a website is infected with iScam, Avast SecureLine VPN blocks it, so users will not encounter the scam. For your best protection, Avast SecureLine VPN is available to download in iTunes.

How to clean your system if you’ve been infected by iScam

  • Turn on Anti-phishing. This can be done by visiting Settings > Safari and turn on ‘Fraudulent Website Warning’. When turned on, Safari’s Anti-phishing feature will notify you if you visit a suspected phishing site.
  • Block cookies. For iOS 8 users, tap Settings > Safari > Block Cookies and choose Always Allow, Allow from websites I visit, Allow from Current Websites Only, or Always Block. In iOS 7 or earlier, choose Never, From third parties and advertisers, or Always.
  • Allow JavaScript. Tap Settings > Safari > Advanced and turn JavaScript on.
  • Clear your history and cookies from Safari. In iOS 8, tap Settings > Safari > Clear History and Website Data. In iOS 7 or earlier, tap Clear History and tap Clear Cookies and Data. To clear other stored information from Safari, tap Settings > Safari > Advanced > Website Data > Remove All Website Data.

Check out Apple’s support forum for additional tips on how to keep your device safe while using Safari.

How to set up your smartphone killswitch

With over 3 million smartphones stolen annually in the USA, and more than 300 each day on the streets of London, smartphone theft is sadly now an everyday occurrence.

These days, losing a smartphone means costs us so much more than the device itself. Our personal information, messages, emails, contacts and social networking profiles are all at stake. When you add banking and shopping apps, the financial costs can also escalate.

One of the most effective defenses against stealing and misusing your device and data is a killswitch functionality with reports suggesting killswitches can halve the number of smartphone thefts. It is so effective, that starting on July 1 2015, the state of California has ruled that all new smartphones must be shipped with killswitch functionality.

Once activated, a killswitch prevents a smartphone from being used or reprogrammed through a factory reset, making it very difficult for phone thieves to sell-on a working device.

The good news is that both Google and Apple rolled integrated killswitches for their smartphones in 2014, meaning that most smartphone users have access to basic level of protection.

Working with Qualcomm, AVG is developing a much more robust solution that is integrated directly into the hardware making it resistant to any number of attacks including factory resets or a SIM swap.


How to activate kill switch on Android

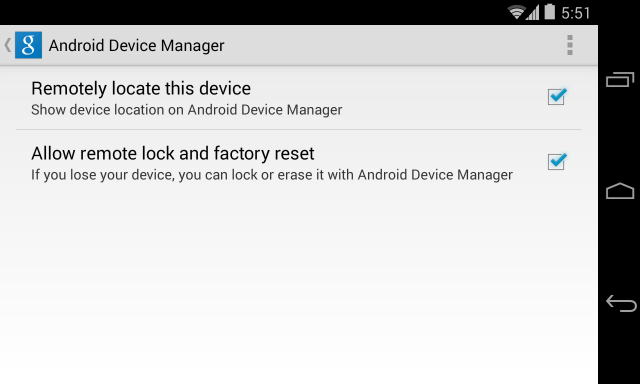
Step One: Set up remote access

  • Go to Google Settings > Android Device Manager
  • Grant permission to both ‘Remotely locate this device’ and ‘Allow remote lock and factory reset’
Android Device Manager


Step Two:

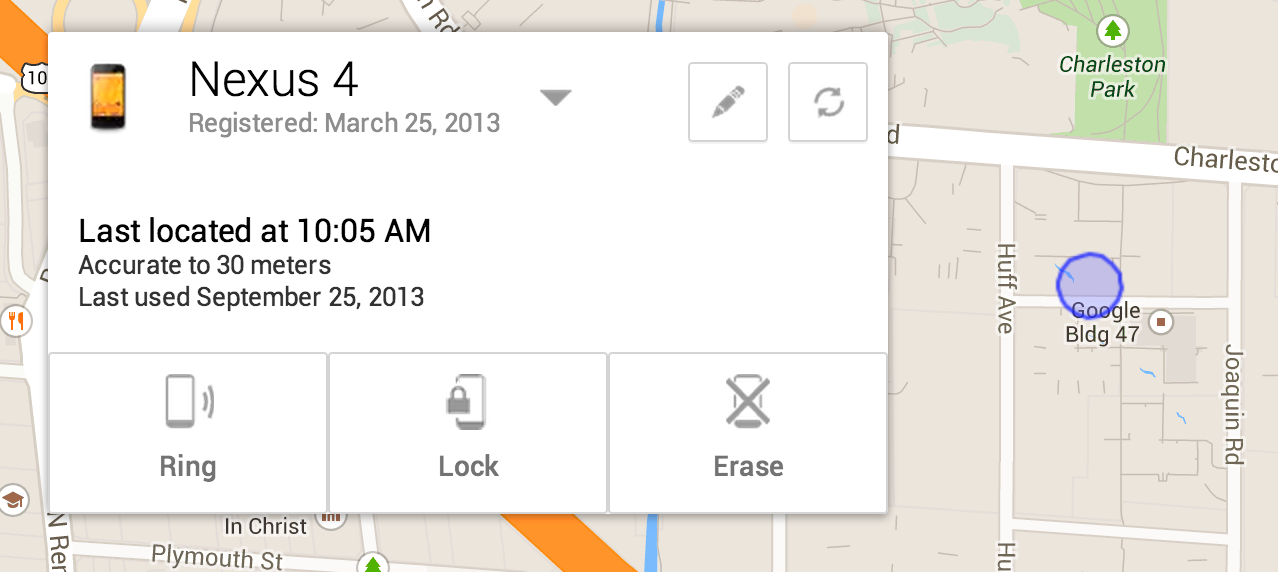
If your device is lost or stolen, go to any web enable device, log into Google and access the Android Device Manager Panel.

You will now see your device location on a map and have options to ring, lock and erase.

Nexus 4


How to activate kill switch on iOS.

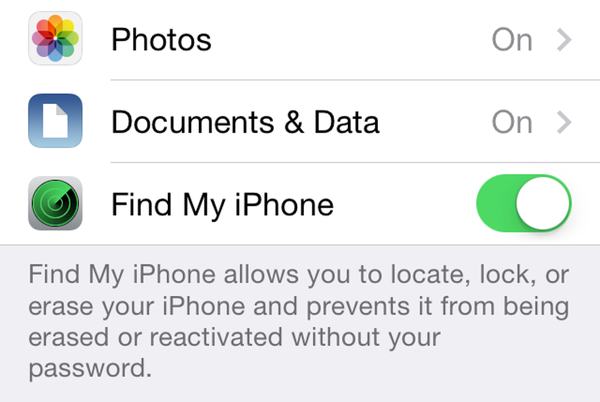
Step One: Enable Find My iPhone

  • Go to Settings>iCloud
  • Sign in with your Apple ID
  • Enable Find My iPhone

Lost My iPhone


Step Two: Enabling Lost Mode

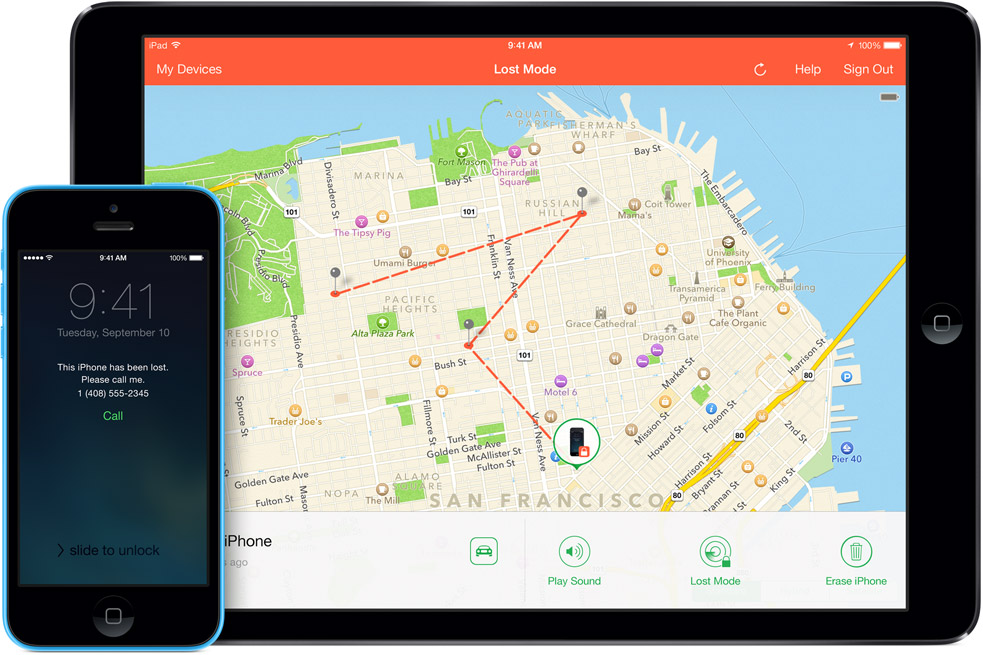
If you believe your device is lost or stolen you can activate the killswitch known as “Lost Mode”.

To do this, go to icloud.com/find from a Mac or PC, or alternatively you can use the Find My iPhone iOS app from another device.

This will bring up the Lost Mode dashboard which should pinpoint where your device is on a map and also give you the option to make it ring, lock it down or erase the data.

There is an option to customise the lock with a contact number for the safe return of your device. If you retrieve the device, you can safely return it to normal using your Apple ID login.

iOS Lost Mode