Tag Archives: Gaming

The Ultimate Witcher 3 Performance Guide

I’ve never touched a Witcher game before but this one really captured me, not just for it’s great storyline or epic scope but how real the forests and the cities look and feel:

Witcher 3

With graphics like these, you need three things: a fine-tuned PC, a decent graphics card and the right settings. In this guide we’ll look at making the Witcher 3 even more beautiful than it already is and also make sure that it runs super smooth on your machine. Ready?

Can your PC run The Witcher 3?

To run The Witcher 3, you need a fairly powerful PC as CD Project RED (the Witcher’s makers) have stated minimum requirements that are quite hefty:

OS: Windows 7 or 8.1

Processor: Intel Core i5-2500k 3.3 GHz or AMD Phenom II X4 940

Memory: 6GB

Video Card: NVIDIA GeForce GTX 660

With this kind of hardware, you’ll be able to play the Witcher 3 at low or medium levels at best. In order to crank up all the details at Full HD, you’re going to need a rig with a far more powerful GPU and more memory:

OS: Windows 7 or 8.1

Processor: Intel Core i7 3770 3.4 GHz or AMD FX-8350 4.0 GHZ

Memory: 16GB

Video Card: NVIDIA GeForce 970 GTX

This is what I’m using and the machine just about manages to produce 50-60fps (frames per second). But no matter whether you got the lower specs or a high-end gaming PC, we’ll show you how to get the highest quality and much smoother framerates.


#1 – Performance 101: 9 Tweaks to Optimize Your PCs and Laptops Performance

Before you start tweaking performance settings for The Witcher 3, I recommend that you follow the 9 essential steps to boost your PC or laptop speed that I published a while ago. This covers the basic steps to get your machine in top shape, including how to:

  • Upgrade your graphics drivers and even use beta drivers
  • Overclock your graphics card (safely!)
  • Use our AVG PC TuneUp to turn off all performance-sapping background activity
  • Defrag your hard disk
  • …and more!

As The Witcher 3 takes its toll on your hardware, you got to be sure that it’s tweaked to its absolute limit before you jump into the game-specific settings.


#2 – Get the NVIDIA & AMD THE WITCHER 3 Drivers

As usual, NVIDIA have prepared a special driver optimized for The Witcher and enables dual GPUs and HairWorks as well as the best possible performance.


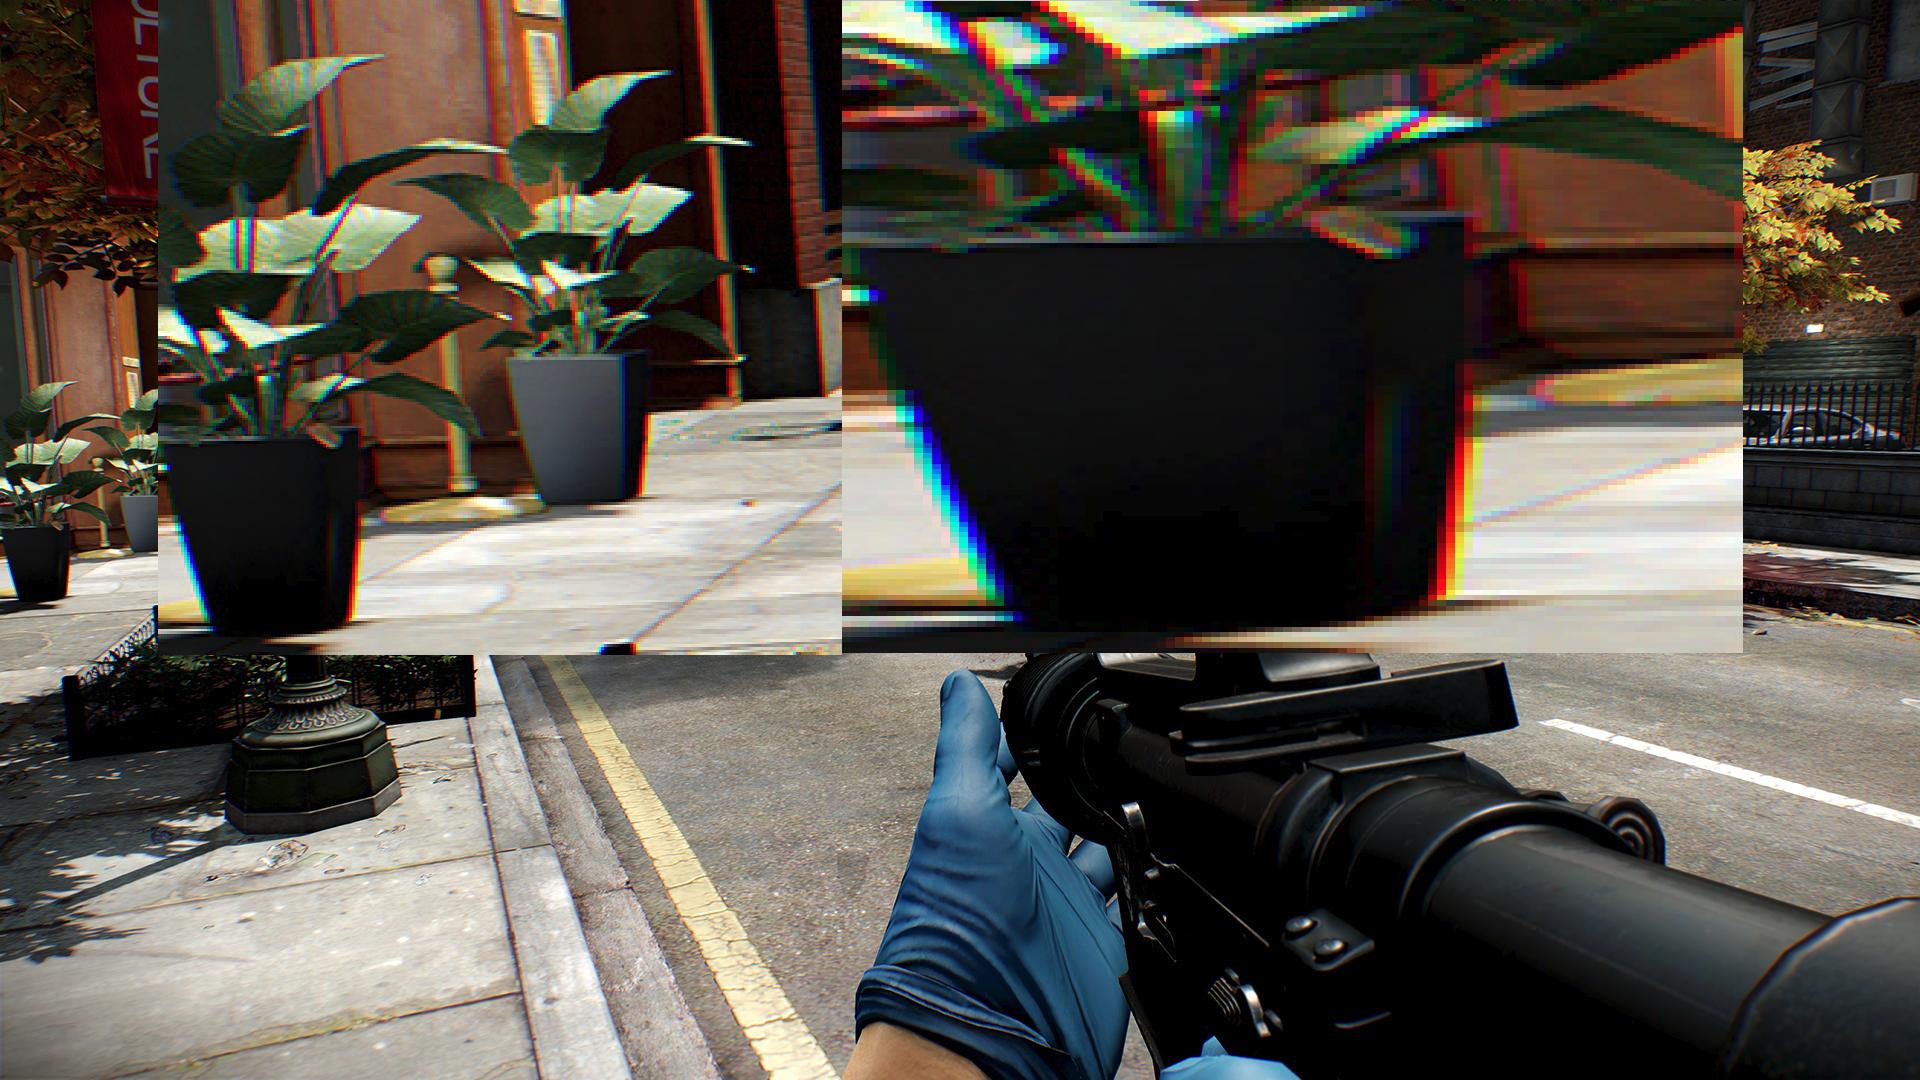
#3 – Use SweetFX to Make The Game Look Gorgeous

The SweetFX tools have long been the first steps to making games look far more beautiful by adding various filters and graphic effects like sharpening and bloom or different anti-aliasing techniques. The thing is: SweetFX simply enables graphical modification, but there are dozens of great different profiles from users from around the world. The ones I’ve tried and can recommend are the following:

Sweetfx


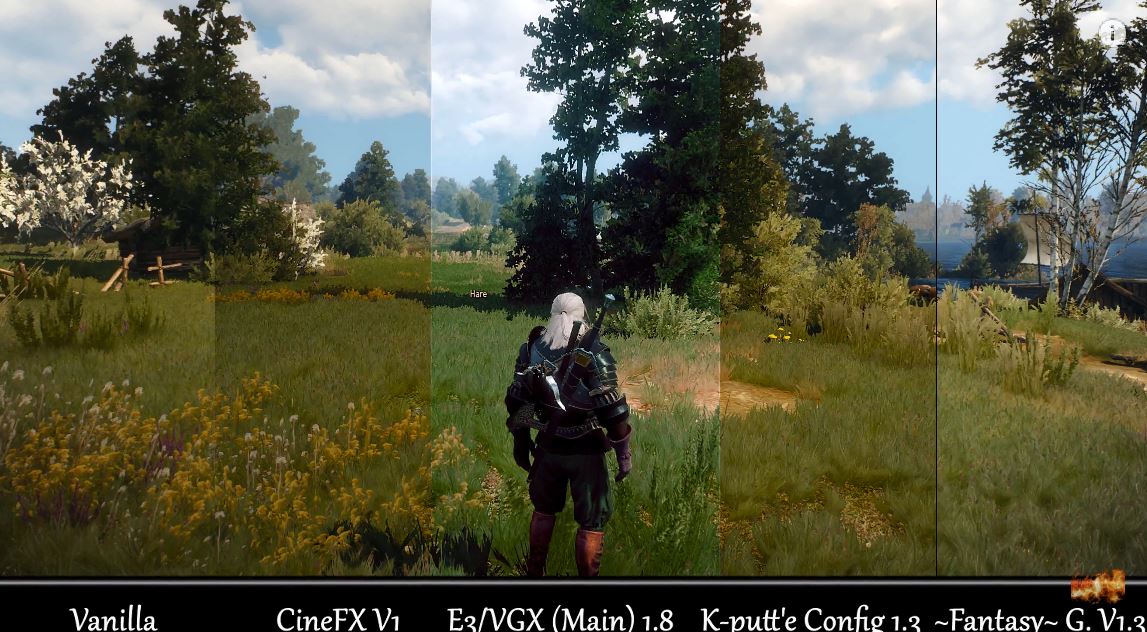
This video should help you get a great understanding of how the various SweetFX settings work.

Video

Witcher Three SweetFX

#3 – Tweak The Graphic Settings

The in-game settings in The Witcher 3 are very straightforward: You’ll find them both under the Options menu and Post-Processing and Graphics. You can chose between presets ranging from Low to Ultra and you should find the ones that really match your computers performance:

Witcher 3 Menu

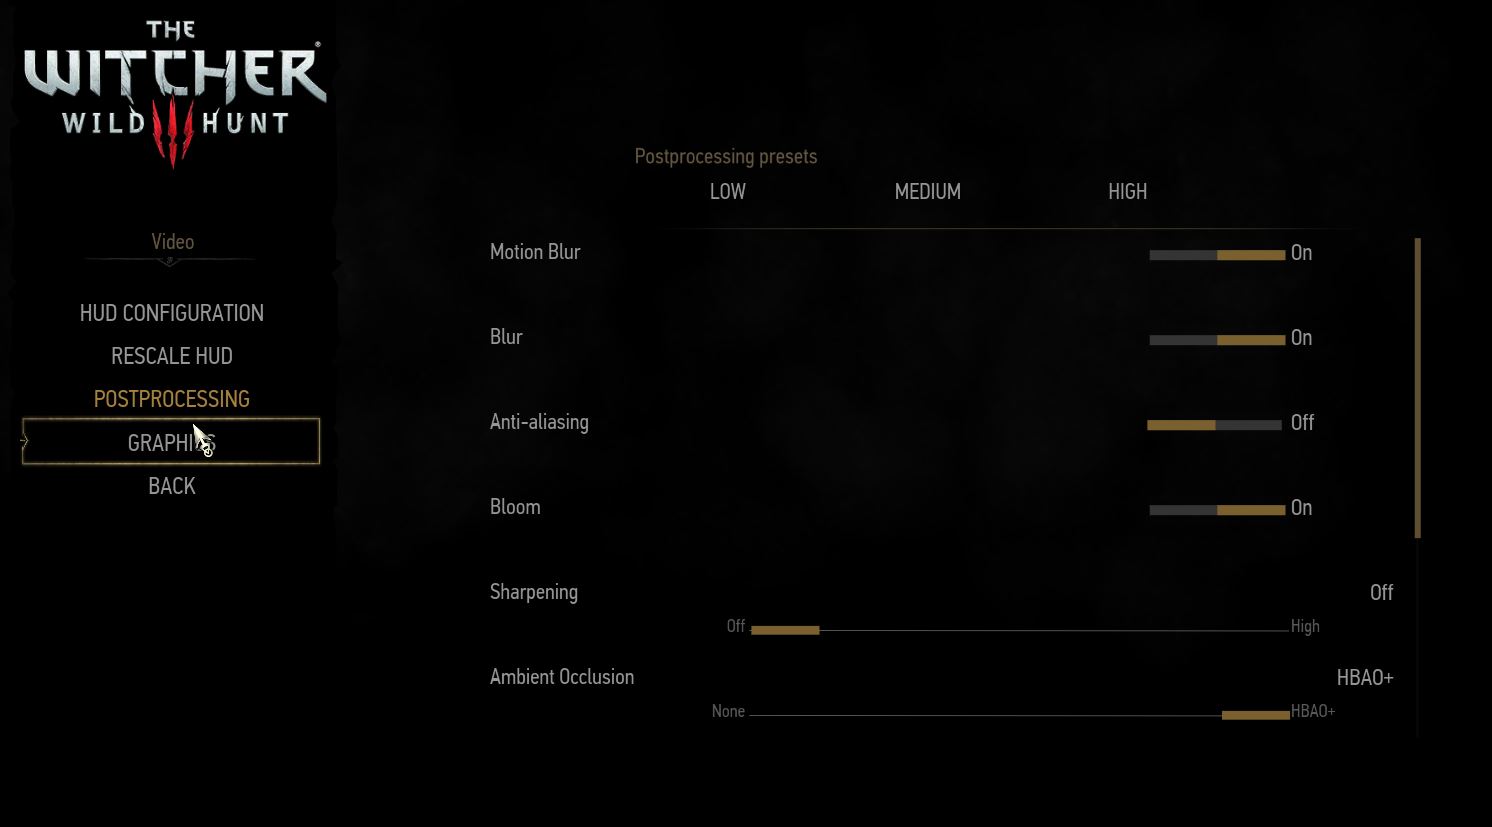
What I would recommend here is turning off Sharpening or setting it to Low as the Highest setting makes everything look just a bit too crisp and unnatural. The slightly blurry look adds to the immersion and also increases performance. If you’ve got a weaker PC, you should definitely turn off Anti-Aliasing and Ambient Occlusion, as these are the big performance eaters here.

Witcher 3 Menu

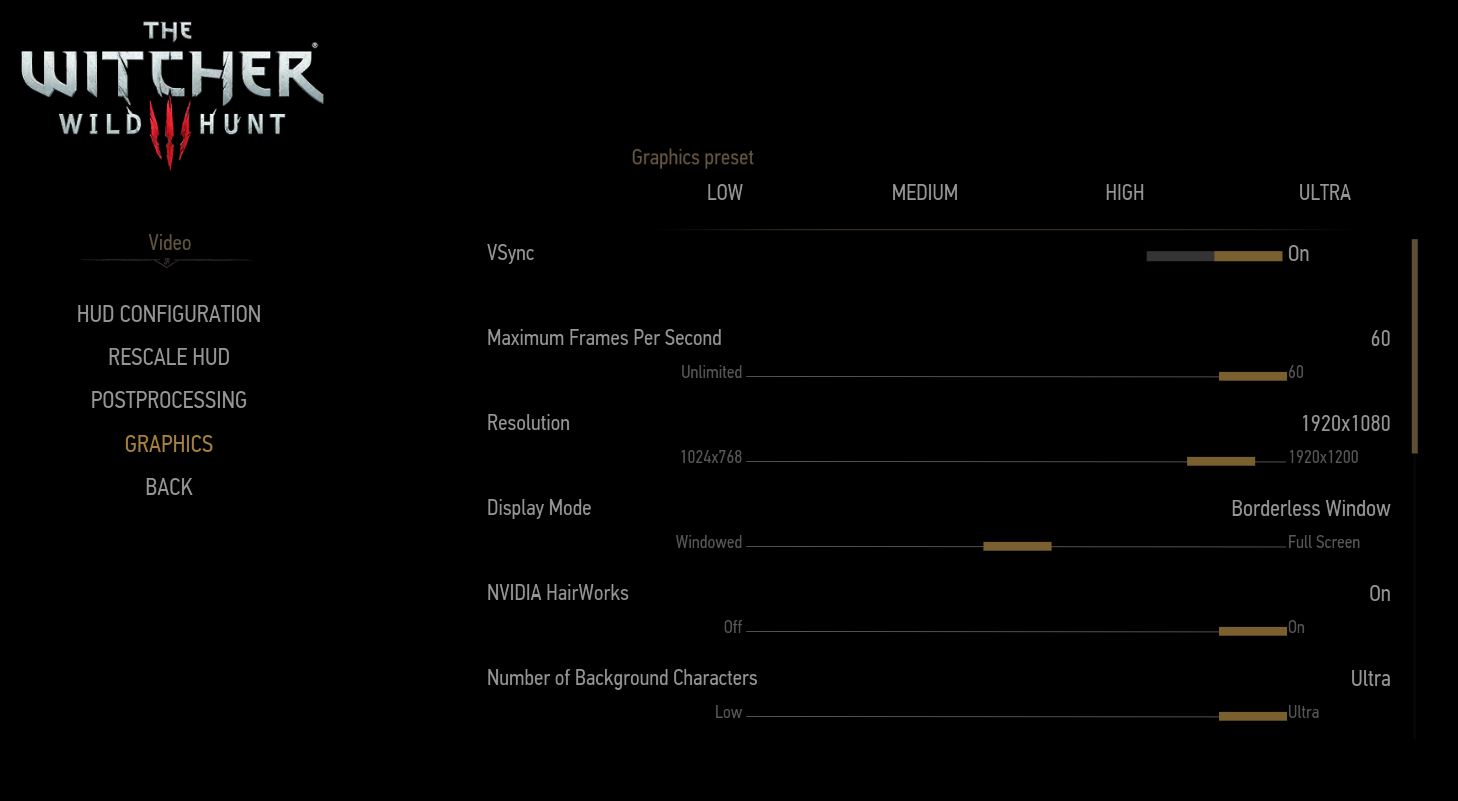
Moving to the Graphics setting, here are some interesting tweaks that made The Witcher 3 run smoother on my gaming PC: First, I switched from Full Screen to Borderless Window. Curiously, that reduced a significant lag when playing The Witcher 3.

The other bit that helped me was turning off Hardware Cursor. Other than that, it’s the usual deal: if the game stutters, try turning down settings one by one. The ones that don’t make everything look awful and still get you a few more fps are Grass Density, Water Quality, and Shadows.

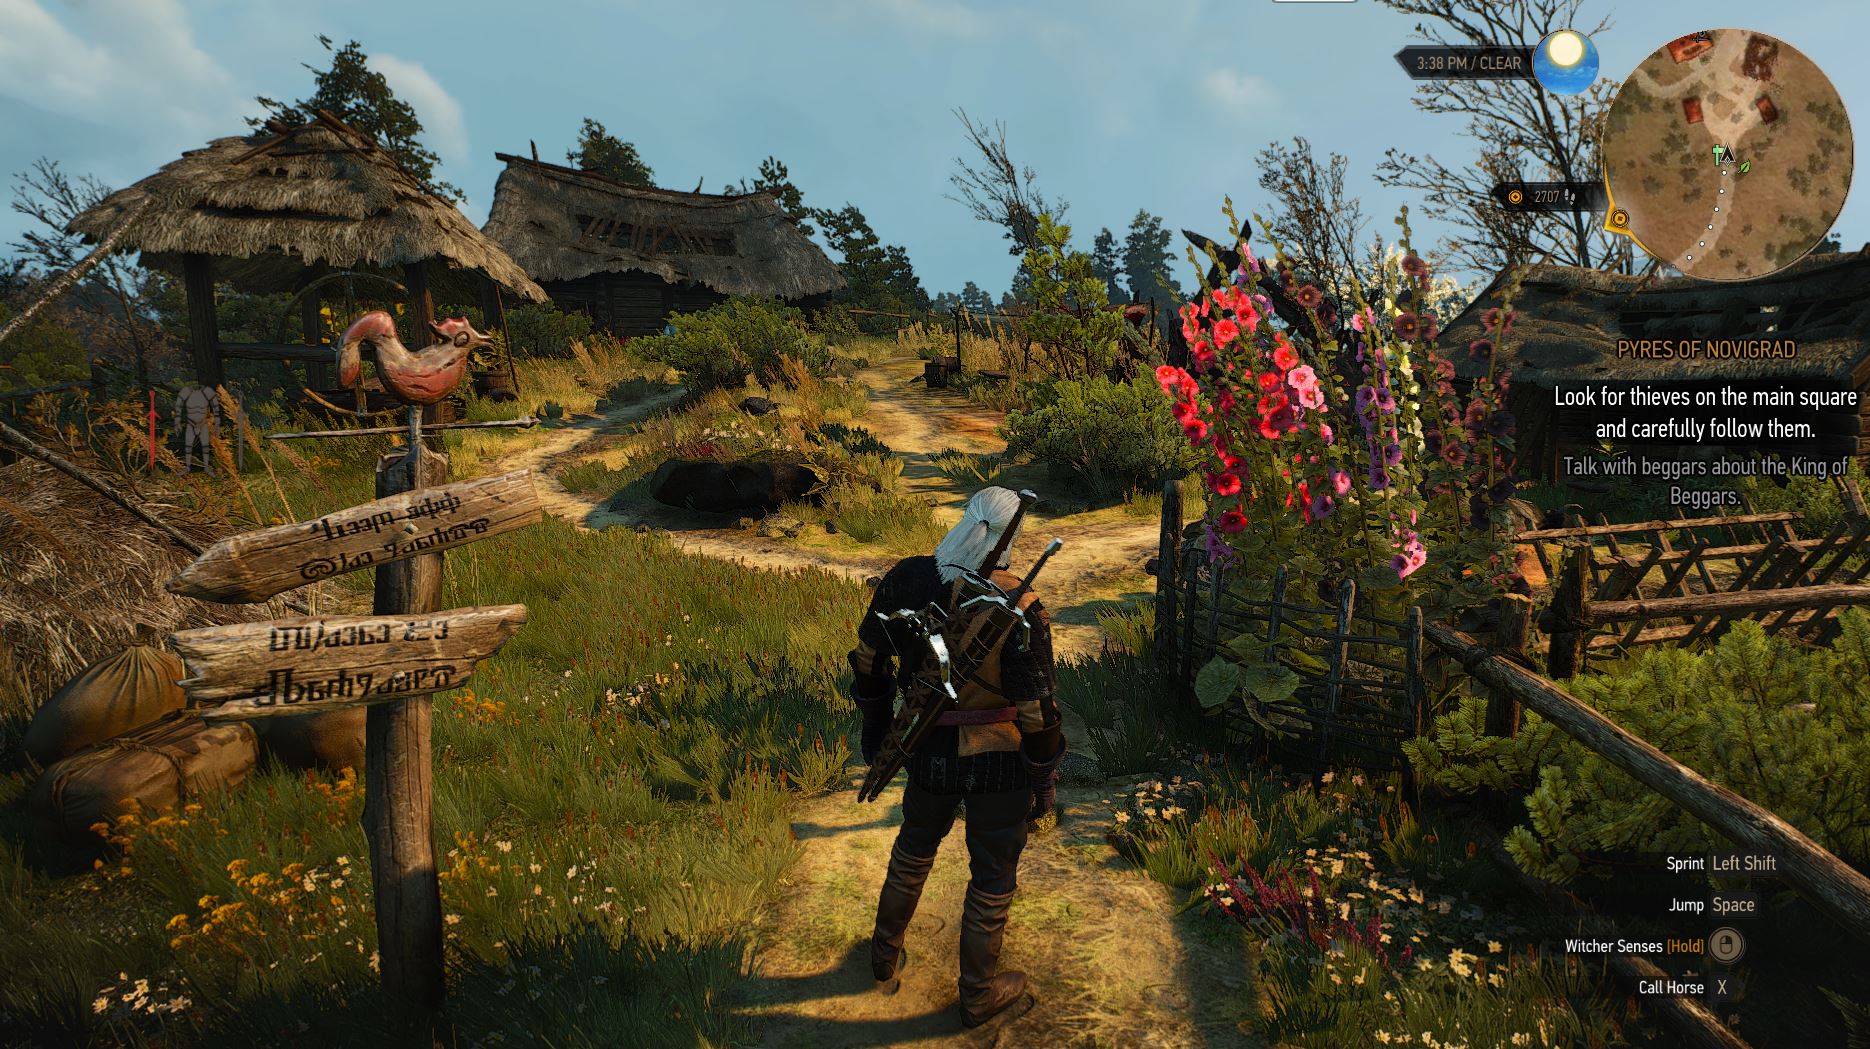
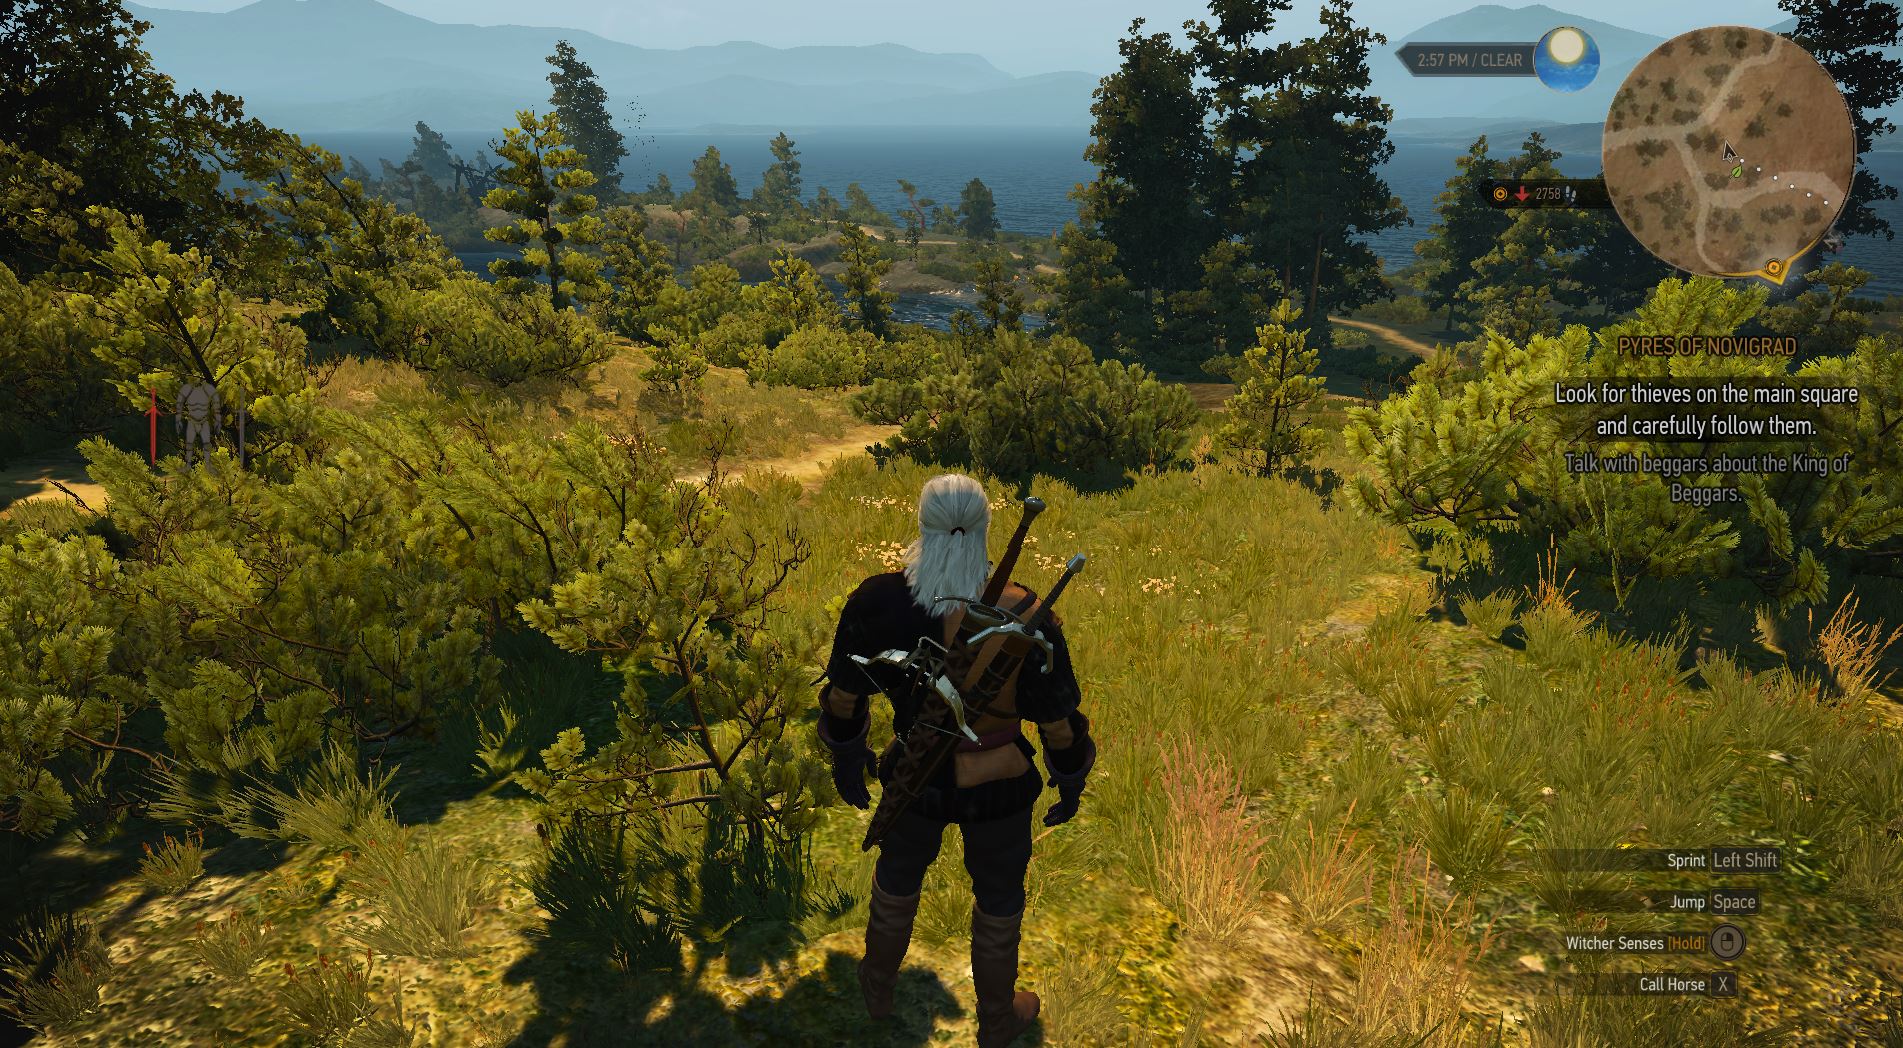
Start lowering these settings first before you lower settings with a more visible effect such as Detail Level or Texture Quality or otherwise your game won’t look as gorgeous as this:

Witcher 3 Graphics

Other than that, a few words on the other options that could help you squeeze out more performance:

  • Ambient Occlusion: HBAO+ should be enabled as it adds better shading and lighting effects to any scene at not too high of performance cost. If you’re really struggling with low frames per second, you should try the less taxing SSAO technique before turning it off (which really impacts the visuals). This comparison video will help you get a sense of the impact:

Video

Witcher 3: Ambient occlusion


  • HairWorks: Hairworks is a NVIDIA specific technique that makes hair on both the protagonist Geralt and monsters look fantastic. If you don’t care about having every single strain of hair perfectly animated, you can save a ton of performance by turning it off.
  • Grass density: Even on my rather powerful gaming PC, turning off grass density had a noticeable effect on smoothness in some scenes.


#4 – Boost Your Visuals with These 5 Hidden Tweaks

Got your Witcher 3 maxed out and it’s still super-smooth? Then let’s try a few hidden tweaks that’ll make The Witcher 3 look even more gorgeous than before. However, you need to do a bit of fiddling: First, you need to make sure that your in-game settings are perfectly tweaked (you’ll soon know why).

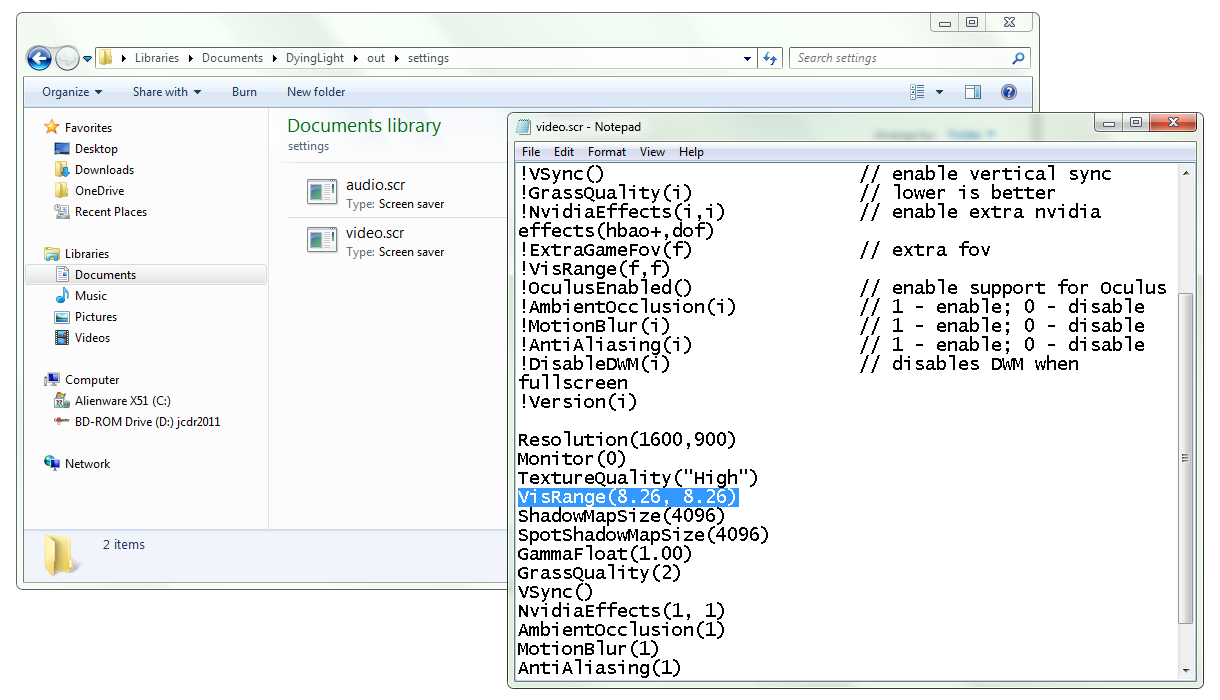
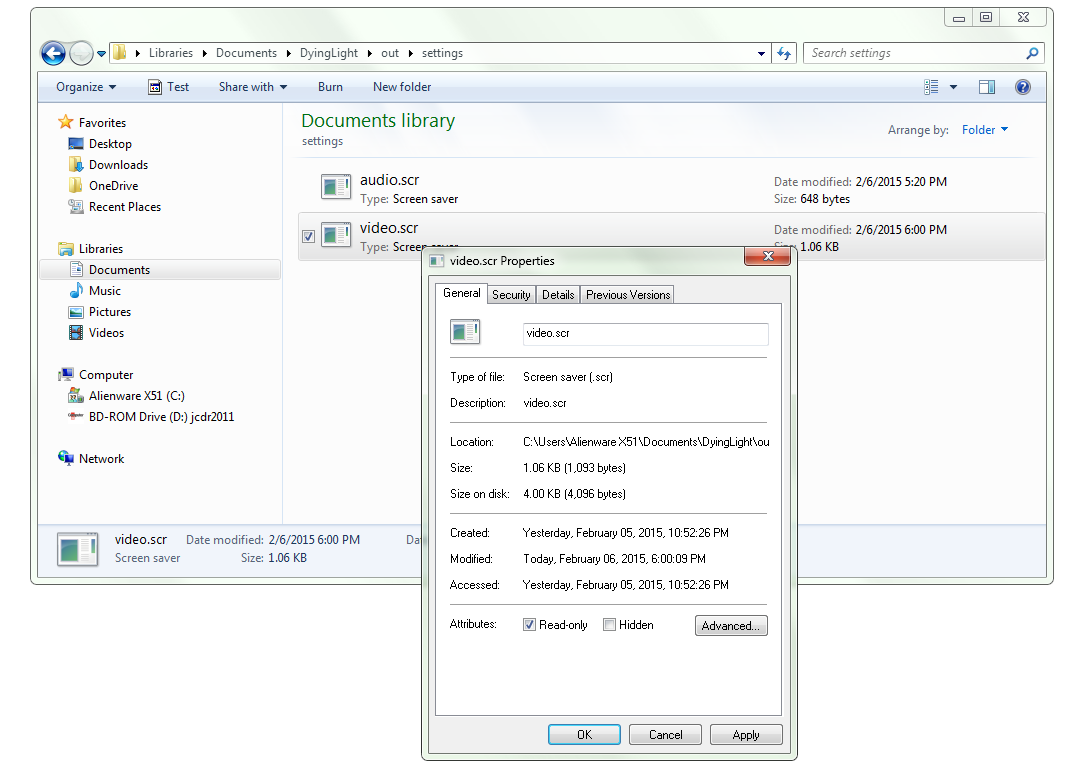
First, go to your user folder under “C:UsersUSERNAMEDocumentsThe Witcher 3”. Make a copy of the file “user.settings” and open it up with Notepad.

Witcher 3 Notepad

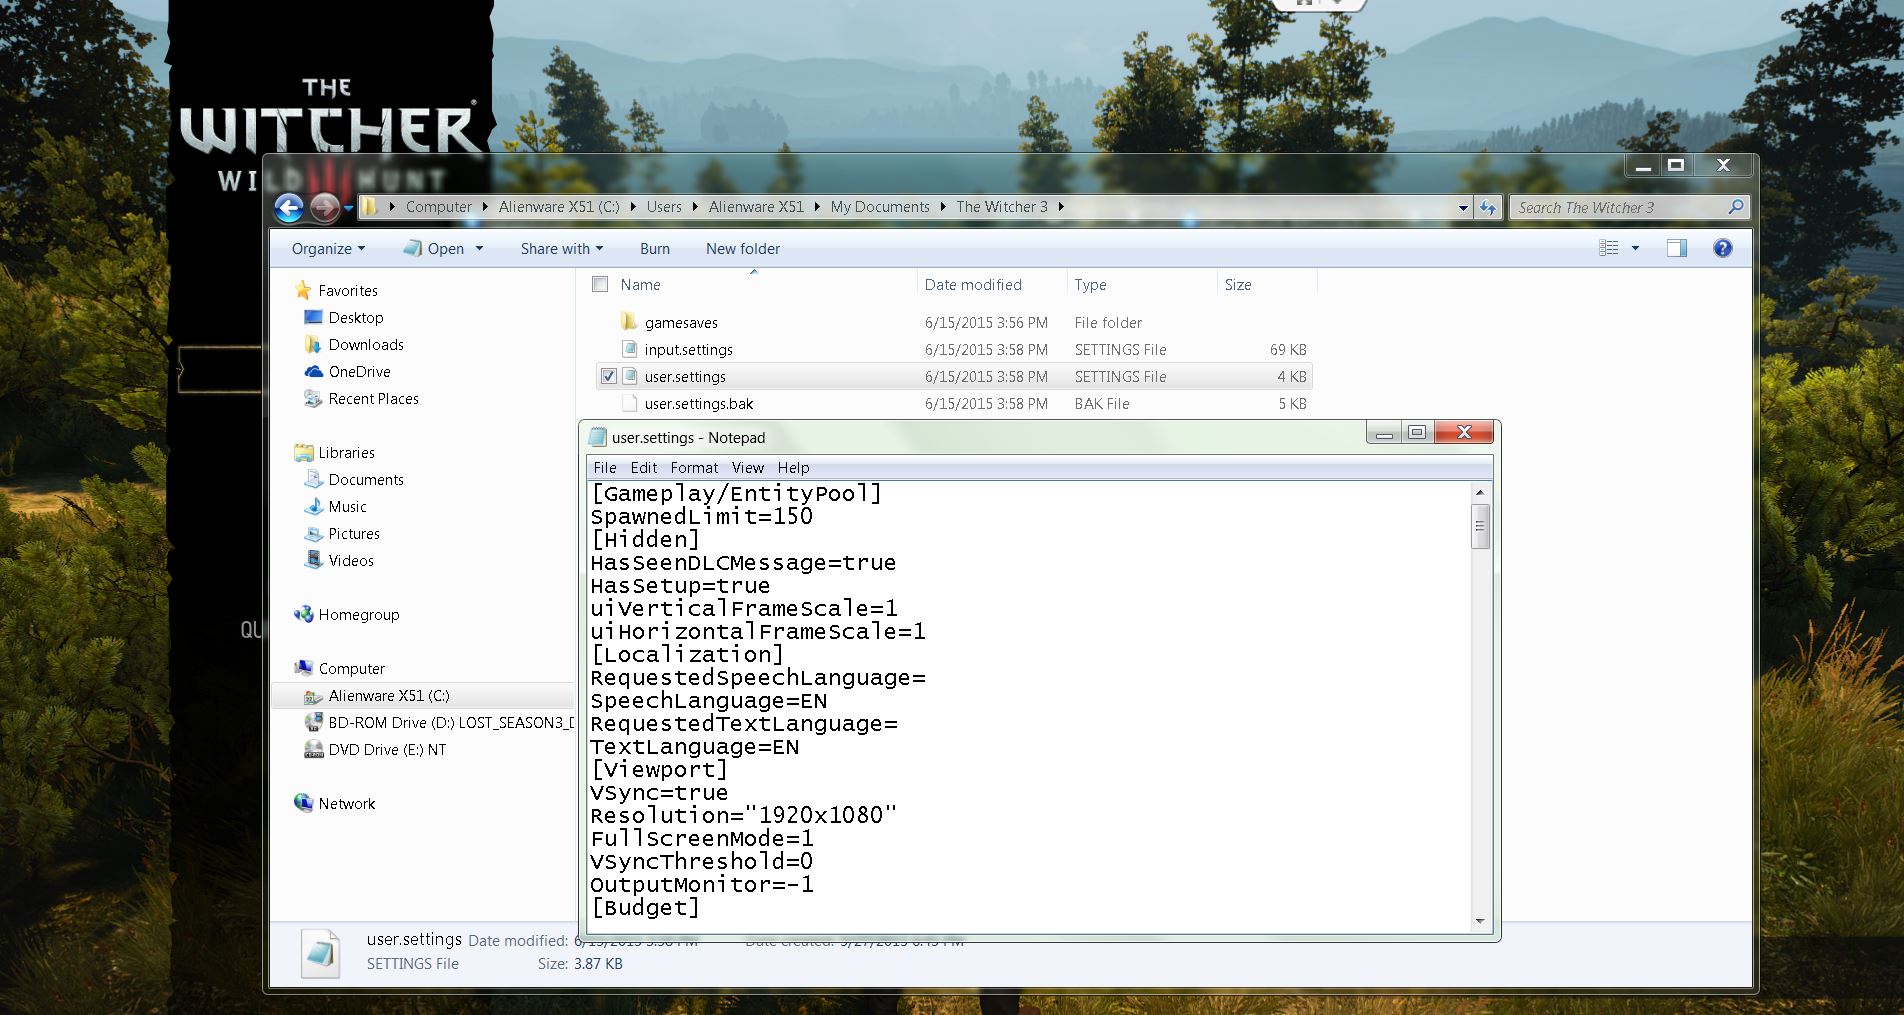
While a lot of these settings are still unexplained, users on the web have figured out the effect of some of these. First, jump to the line GrassDistanceScale and FoliageDistanceScale. This value defines the quality of every piece of nature you see on screen, such as grass, trees or bushes and the distance at which you can still see them.

If you go with the games Ultra setting, this setting will be at 1.5. If you’ve got a powerful rig, try cranking it up to 3 to get a noticeable improvement in The Witcher 3’s beautiful environment.

Witcher 3 Hairworks

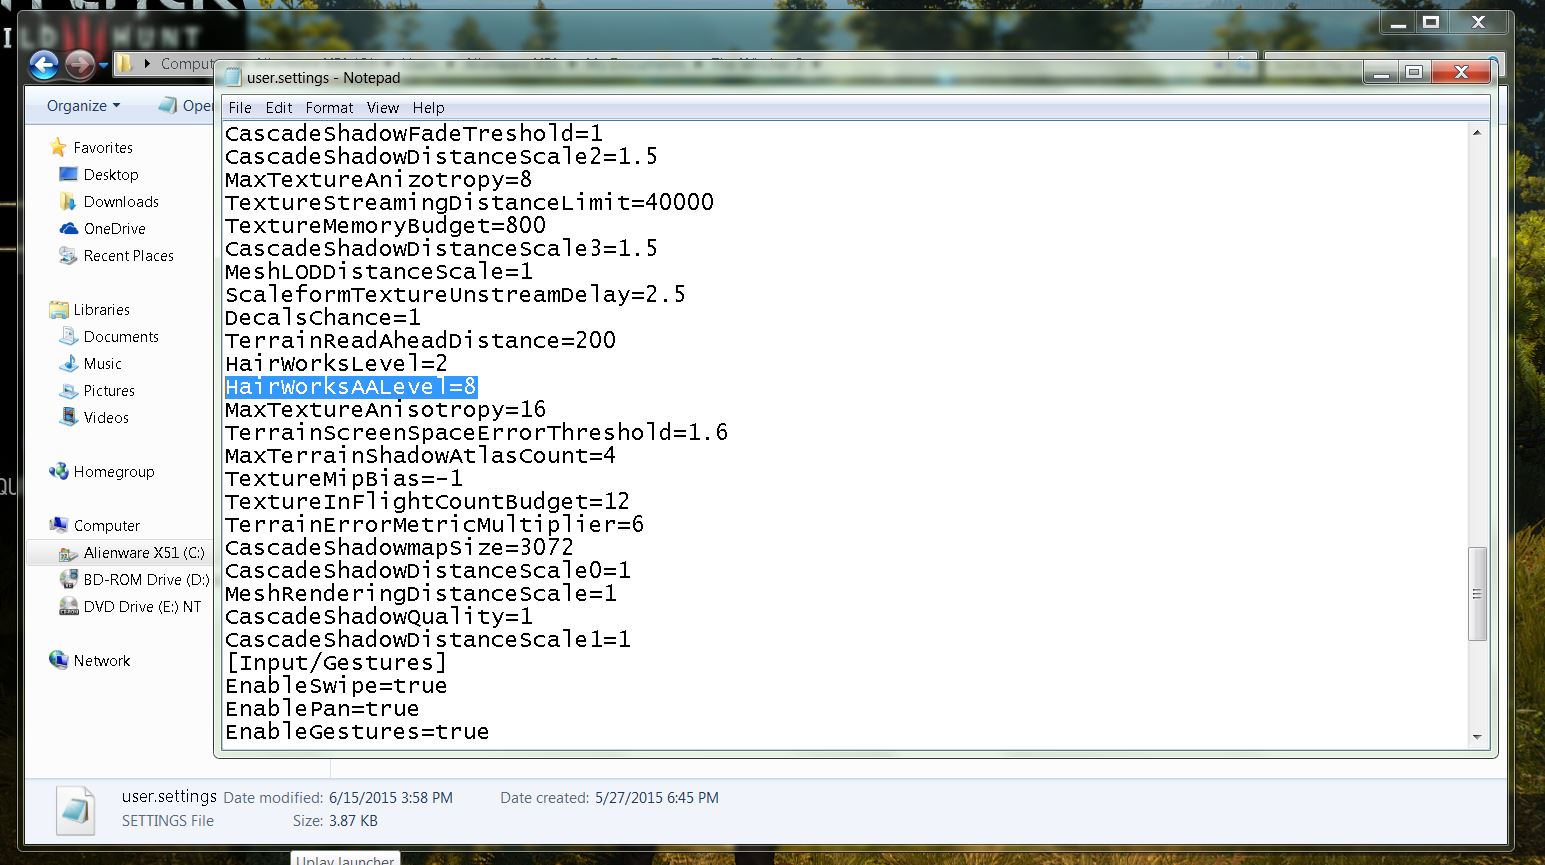
Next, we recommend adding a new entry under the [Rendering] section called HairWorksAALevel. This setting determines the level of anti-aliasing on hair on NVIDIA graphic cards. If you set this to 8, hair will render without jaggies or other strange artifacts at the cost of just a few frames per second.

Done with all the settings? Save the file! But here comes the important part: To prevent the game from changing the settings back to its default, you have to make the file ready-only. To do that, right-click on the user.settings file and select Properties. Check Ready-only and hit OK to write-protect it! Hint: In addition to that, AMDs support pages recommend setting the EnableTemporalAA setting from True to False on multi-GPU systems (AND CrossFire: More than one AMD/ATI card in one system).


#5 – Make Sure Your NVIDIA & AMD card is set up properly

If The Witcher 3 is stuttering when you’re roaming about in towns, there is a specific setting you have to make within your NVIDIA or AMD cards control panel:

  • NVIDIA: Go to Manage 3D settings and scroll to the Maximum Pre-rendered Frames.

Witcher 3 Pre render


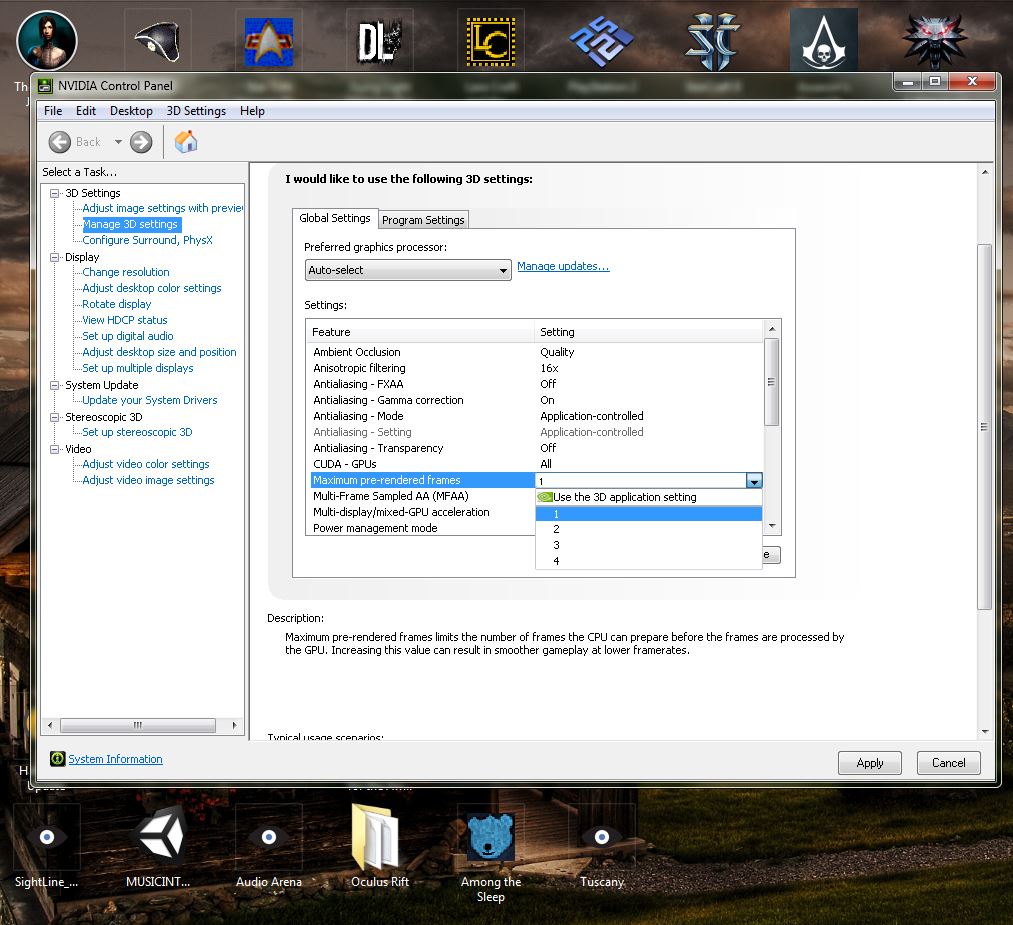
  • Set this to 1 to reduce any stuttering.
  • AMD: Under Radeon Pro, create a new profile for The Witcher 3 and set the Flip Queue Size to 1.

We hope you can enjoy The Witcher 3 thanks to our gameplay tweaks and remember, these are only recommendations based on my own tests.

The Ultimate GTA V Performance Guide

It’s been a long time coming, but Grand Theft Auto V is now available on Windows PCs. While Playstation and Xbox players have been enjoying this title for some time already, I strongly believe that PC is now the platform to play GTA V.

Why? Well quite simply, the PC has so many great options to tweak that gamers can really control and enhance their gaming experience!

If you have bought GTA V for PC and are wondering how you can improve framerates, graphics and more then you’re in luck. I’ve run a series of benchmarking tests on GTA V and have put together my top tips on getting the most out of this red hot title!

So without further ado, here is The Ultimate GTA V Performance Guide.


Download the full guide 

The Ultimate ‘Dying Light’ Performance Guide

I have to admit it, I got tired of zombies. After the Walking Dead craze, in the past two years, an endless amount of zombie movies, TV shows and games came out of nowhere.

For me, that genre got tiring quickly which is why I also ignored the latest hype around games like H1Z1, DayZ, Days to Die or the Resident Evil Remake. However, one game caught my eye: Dying Light. From the moment I saw the visuals and the gameplay mechanics in the trailer, I was hooked.

The parkour elements, the stealth action, the combat, the entire look and feel – it just captured me. But when I heard that many users are complaining about performance, I just had to write another performance guide!

More than Minimum Requirements

My first piece of advice is that you should largely disregard the minimum requirements as that will likely give you only a lackluster experience:

Minimum System Requirements

  • Processor: Intel Core i5-2500 @3.3 GHz / AMD FX-8320 @3.5 GHz
  • Memory: 4 GB RAM DDR3
  • Graphics: NVIDIA GeForce GTX 560 / AMD Radeon HD 6870 (1GB VRAM)

While testing that on my laptop (3.7 GHz, GeForce 650M) I found that I was getting less than 30fps at medium settings, while my gaming PC (Core i7, 3.8 GHz, GeForce 970 GTX) handled things a lot better – at the highest details.

However even on my gaming rig I was able to detect a slight stuttering here and there, which is why I put together a list of tweaks for Dying Light and was able to finally smooth out all the performance problems.

Realistically you need a GeForce 6 series, 8 GB RAM and at least 2.x GHz CPU to run Dying Light properly.

Dying Light

#1 – Start with the basics

Before you start tweaking performance settings for Dying Light, I recommend that you follow the 9 essential steps to boost your PC or laptop speed that I published a while ago. This covers the basic steps to get your machine in top shape, and including how to:

  • Upgrade your graphics drivers and even use beta drivers
  • Overclock your graphics card (safely!)
  • Use our AVG PC TuneUp to turn off all performance-sapping background activity
  • Defrag your hard disk

As Dying Light takes its toll on your hardware, you’ve got to be sure that it’s tweaked to its absolute limit before you jump into the game-specific settings.


#2 – Get Patch 1.3

As usual, getting the latest patch is always a bonus. Patch 1.3 is supposed to improve performance quite a bit, especially for GeForce GTX 970 users. However, the team is currently working on a patch to solve more deeper routed speed problems including:

  • Performance issues of systems based on the AMD processor
  • Freezes when using Nvidia DoF
  • Unsatisfactory performance on multi-GPU systems

Update 1.3 should be applied automatically once you launch the game over Steam or standalone. But please check back for an upcoming patch which will hopefully fix all the issues above.

Dying Light Main Menu


#3 – Reduce the View Distance

To almost double the performance of Dying Light, I’d recommend reducing the View Distance slider found in the graphics options (Options, Video) to medium or even low.

Sounds like the game is going to look bad? No, actually there was hardly any difference while the framerate on my gaming PC jumped from 35fps to almost 60 when playing with the lowest setting.

100% Viewing distance

Dying Light View Distance 100


5% Viewing Distance:

Dying Light View Distance 5

You can see that some minor details are missing in the background, particularly when looking at the trees and grass in the background, but it really doesn’t make a huge difference, given that you can double the framerate.

This has much more effect than turning off some of the beautiful visual effects like HBAO+/SSAO (which gives you a plus of 2-5fps at most if you turn if off).

Dying Light also supports “DoF” (Depth of Field) which blurs out parts of the image. You can easily see the effect in the main menu screen under tip 2 (blurry background).

The same goes for Foliage quality, which actually made a difference of just 3-4 fps on both of my machines – only turn this off (or set it to low) if you’re really struggling to hit an acceptable framerate. Because if you do, it’ll literally just remove some of the grass and bushes:

Foliage quality set to “High”

Dying Light Foliage

Foliage quality set to “Low” (never mind that zombie, he jumped over that fence and killed me five seconds later while I was taking screenshots for you – that’s dedication!).

Dying Light Foliage Low


If you’re noticing that your framerate goes down over longer periods of gaming time (e.g. 1-2+ hours), then you may want to lower the Texture Quality setting. Why? While it makes no visible difference up close, it defines how many objects are put into the VRAM of your graphics card.

If you lower it, less objects will be stored in your graphics card memory which could cause objects to stop popping in more frequently – but the overall game to run more smoothly.


#4 – Restore the Maximum Viewing Distance

With Dying Light patch 1.2.1, game makers TechLand decreased the maximum view distance by 35% overall: Eagle-eyed gamers with top-of-the-line gaming PCs (we’re talking GeForce 970 or 980s here), can manually override that setting.

However, you must first perfectly set up the graphics of your game as you will basically change a configuration file and make write-protect that file so that Dying Light won’t automatically revert to the lower view distance.

Here’s how:

Make sure that Dying Light is optimally configured and then exit the game. Open up “C:UsersUSERNAMEDocumentsDyingLightoutsettingsvideo.scr” using Notepad or a tool like Notepad++ and look for the word “VisRange”.

Change the value to VisRange(8.26, 8.26) which will restore the 100% visibility. Save the file!

Dying Light Viewing

Next, right-click on the file and select Properties. Check the Ready Only box and hit OK.

Dying Light Video Properties


If you want to tweak your settings from here, you need to undo the write-protect and later apply the VisRange tweak again before write-protecting the file again. A bit of a hassle, but beauty comes at a price, right?


#5 – Get the Game Ready Driver

At end of January, nVidia released a new driver specifically optimized for Dying Light which all users GeForce cards should install asap. Version 347.25 offers much smoother gameplay and adds support for the GeForce GTX 960 and a new Anti-Aliasing technique called MFAA (Multi-Frame Sampled Anti-Aliasing). ATI/AMD users should also look out for the latest drivers to ensure best possible performance.


#6 – Fix The Multicore Problems Yourself (experimental)

Until patch 1.4 comes out and offers a fix for the fact that Dying Light only uses one CPU core in some cases, you can try out this little tweak which helps on some systems.

Open the game and then use CTRL+ALT+DEL to open Task-Manager. Right-click on DyingLightGame.exe, go to Set Affinity, uncheck all CPUs and then re-check CPU 0.  Hit OK. Open the affinity window again and re-check all processors. The game should now use all of the cores and balance the load equally instead of taxying only one core.


#7 – Get the Dying Light Manager

On the web you’ll find a dozen or so tweaks which will help you disable the filmgrain effect, change sunlighting or disable some of the blur and coloration around objects or people in the game.

However, these require a lot of tinkering with the game files which is just annoying. Good thing there are modders out there like vismxownz who created the Dying Light Manager and Performance Booster (name is really the game here!).

Note, the MediaFire download may not work the first time – try the Try Again and Repair my download option in case that happens and it should work fine. It gives you a plethora of options to tweak some settings which will definitely help you boost performance of the game and which are not available in game:

Dying Light Manager

Extract the file and browse to the DyingLightGame.exe file on your PC, for example under C:Program Files (x86)Dying Light.

Some of the highlights include:

  • Filmgrain: While I personally think that the filmgrain effect adds a lot to the scenery and atmosphere of the game, I know a lot of people don’t like it. It also has a bit of a performance impact.
  • Sunlightering and Sunshadows: Whenever you look at the sun, you will see shadows and the coloration of the entire scene changes. This could be quite annoying in the middle of a hectic zombie fight, so some users may want to turn it off (and also gain a bit of performance!).
  • Chromatic Aberration: It essentially fakes a bad camera by adding a slight color bleeding effect to the edge of objects. Reddit user sadzora captured this quite accurately:

Dying Light Chromatic Abberation

It’s also quite a strain to performance. If you can live without it (and many users can), it should be turned off.


#8 – Enjoy!

I can’t wait to play this game, now optimized and running smoothly, this weekend. It will be pure joy! Were you able to run the game at its fullest? Do you have any other tweaks we missed? Let us know!