Tag Archives: How To

How To Boost Your Home Wi-Fi Signal (Part 1)

Do you regularly lose connectivity to your Wi-Fi network at home? Are network speeds so low that it takes forever to even copy a simple picture or music file across your PCs – let alone stream video? In this two-part series, we are covering the most important lessons and tips for boosting wireless (WLAN) throughput across your home network. Ready? Let’s dive in!

Figure out the best possible router position

Have you wondered why your wireless signal is strong in some rooms and incredibly weak in others? It’s not only a matter of distance between your wireless router and your PCs or laptops. It’s also a matter of what objects (walls, doors, furniture, electrical equipment/outlets) interfere with a good signal.

In many scenarios, you will be able to boost wifi strength significantly by just repositioning either your router or the connected PCs slightly.
Now, the “Trial and error” method works eventually, but is a waste of time. To get the best possible location you need to create a visualization of network coverage across your home. Heatmapper, a free software for Windows, will do just that:

Click here to download Heatmapper (100 MByte). Note: A registration is required to download this free tool.

After installation, the program asks you if you’ve got a map of your map of your floor – no worries, if you don’t, you can create this heatmap based on a grid. Simply walk around your apartment or house with a laptop in your hand running Heatmapper. As you walk (slowly!), use the left-click button frequently as you walk. Walk through all the areas of your home left-clicking as much as you can.

When you’re done, right click and HeatMapper will create a map of your home, showing you where the Wi-Fi signal is stronger or weaker. Here’s how my map at home looks like:

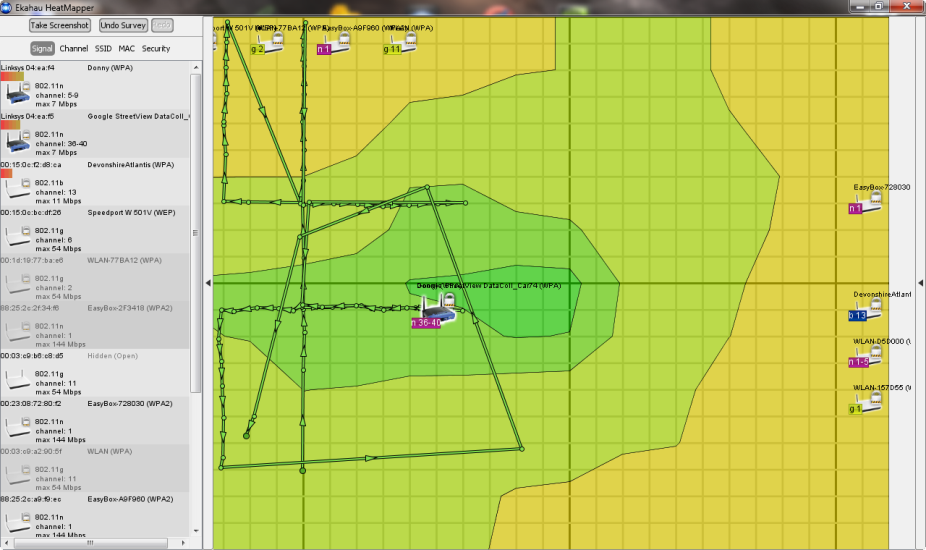
The green area in the middle is also the center of my apartment – a good location for the router! However, in the bedroom (upper part of the screen) I only get „ok“ wireless strength because the router is blocked by three walls.

By looking at the heatmap, I quickly knew where to position the router in order to get a better Wi-Fi signal!
General advice: Make sure not to position the router directly on the floor or next to thick walls. Ideally, the best position is in the center (probably the corridor) of your apartment with no or minimal objects blocking the signal!

Use the latest drivers and firmware

It’s rare to find firmware for a router or driver for a network adapter that works perfectly right out of the gate. Most „V1“ drivers and firmwares of network equipment I have used were bad and came with all sorts of problems: slow connections, drop outs, missing features and other quirks. The first thing I always do when I get a new network device is: look for updates!

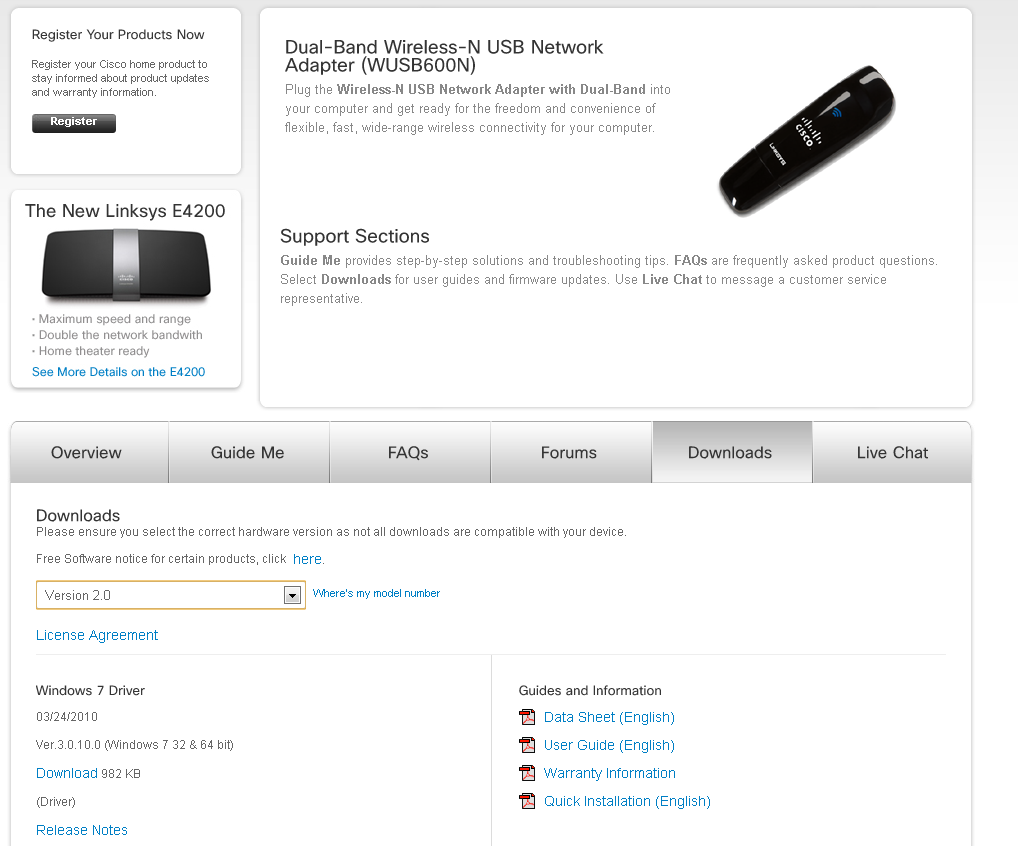
For example, when I bought my Linksys WUSB600N adapter it didn’t work (at all!) under the 64-bit-version of Windows 7. I actually bought the device and couldn’t use it for a couple of weeks until the manufacturer delivered an updated driver that worked under the x64 architecture.

Upgrading the firmware of your router has become somewhat easy over the past couple of years: Simply open up the firmware configuration page in your browser (see below) and find the „Firmware Upgrade“ page.

Here you will find direct links to drivers for some popular router manufacturers:

These links will you to the most recent Wi-Fi drivers available. Your wireless adaptor is not on the list? You haven’t found anything using popular search engines? Hit the comment section and provide us with the detailed specs of the Wi-Fi adaptor as shown in your device-manager.


Upgrade your Wi-Fi hardware

If you’re using the 802.11g (or even b/a) wireless standard, more bandwidth-related tasks such as video streaming, launching remote applications or file copy operations will be painfully slow. All three network standards provide a relatively low maximum bandwidth:

Theoretical speed

802.11 (1997) 2 MBps
802.11a (1999) 54 MBps (short range, high cost – mostly in business use)
802.11b (1999) 11 MBps (slower, but higher range than a)
802.11g (2002) 54 MBps (long signal range)
802.11n (2006) 300 MBps (through multiple channels and frequencies)
802.11ac (2012) 1 GBps (through multiple channels and frequencies)

As you can see, 802.11ac is the way to go these day– over the next couple of months, it’ll replaced the older 802.11a/b/g networks, and offers much improved speed, coverage and reliability. In general, 802.11n is at least twice as fast than its predessor “n” while promising theoretical speeds of up to 1000 Mbp/s.

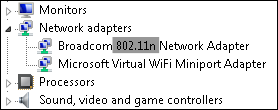
If you’re suffering from a low network bandwidth, be sure to pick a router and Wi-Fi adapters that supports at least the 802.11n specification. If you bought a PC or laptop within the last couple of years, it’ll (very likely) have a 802.11ac wireless adapter. To go check, simply fire up Device-Manager…

…or take a look at your hardware specification sheet, for example:

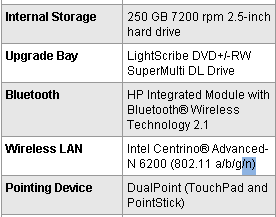
If your adapter does not support 802.11n or ac but your router does, it’ll obviously use the lower N, G, B or even A modes. So make sure that all parts of your wireless chain are “n” compatible!

When shopping for a new network adapter or a router that supports 802.11ac, you should take the following three tips into consideration.

Pick a dedicated USB adapter:

Even if your laptop or desktop has a built-in 802.11ac adapter that is connected to a full-fledged 802.11n router, you might want to look into getting a dedicated (external) USB wireless adapter. Sounds ridiculous, but in my experience many external Wi-Fi adapters perform much better than built-in devices.

When I first got my Linksys WRT610N router, I got quite mixed results and only an average of 100-170 Mbps when the theoretical limit of this beast is around 300 Mbps. So I drank the cool-aid and ordered the adapter that, according to the manufacturer Linksys, “works best with” my router – the WUSB600N USB wireless adapter! And what a difference that made: Signal strength did not change, but the speed went up significantly. Here’s a screenshot of my laptop that’s using both the built-in Wi-fi chip as well as the external USB adapter to connect to the router:


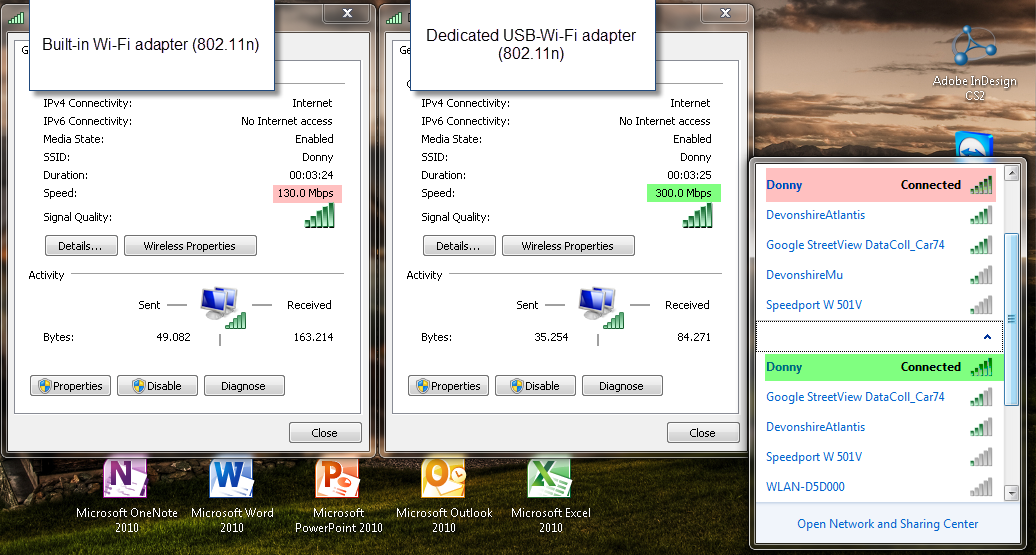
The maximum speed meter went up from 130 Mbps to 300 Mbps. Of course, that is the peak value, but only with this little addition was I able to stream full-definition 1080p video across my apartment with no stuttering or delay whatsoever.

Stay in the family: Besides using external dedicated Wi-Fi devices, I’d also recommend to pick a router and the adapter from the same company. Now, that doesn’t mean that a Linksys router wouldn’t work with a Broadcom or D-Link network adapter, but it’s also my experience that you get the best-possible performance if you „stay in the family“. Now I know that this is what the manufacturer wants but in this case I’d go with it.

Use an external antenna for your router. You can significantly boost your Wi-Fi connection by replacing the antenna or add another external antenna. This guide as well as this one help you figure things out.


Change the Wi-Fi channel

All modern routers are capable of communicating to your PC or laptop on several different channels. However, if your neighbours Wi-Fi equipment is communicating on the same channel, your network speeds and reliability might suffer. Windows offers a built-in solution that lets you see on what channels all your surrounding Wi-Fi networks conmunicate. This is how it works:

Step 1 – Launch the command line. To do that, click on the Start orb, go to „All ProgramsAccessories“ and click on „Command Prompt“.

Step 2 – Type in the following command: netsh wlan show all.


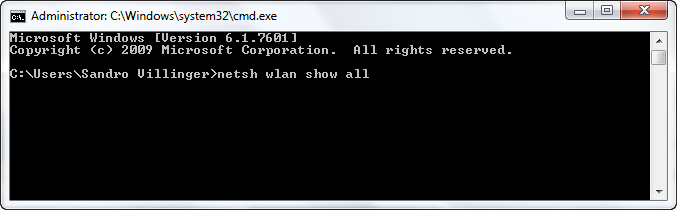
Step 3 – You’ll see a large list of all wireless networks in your area.
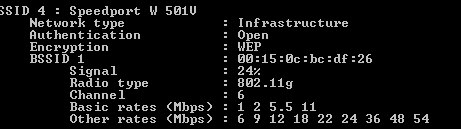
Scroll through the list and watch out for the entry that says „Channel“. Out of those 7 networks, 4 are using channel 6 to send data, two use channel 5 and one is using channel 13.

This is why I should probably choose either a lower channel or a channel between 6 and 13.

Try changing the channel on the routers configuration page.

To open the page, you’ll usually enter it’s IP adress into your browser (check the manual to see which address you need to type in), for example http://192.168.1.1, and enter the user name and password you specified at setup – or the default credentials if you never specified it (which is potentially dangerous)!

Find your wireless channel settings. On my router, that’s under the “Wireless” tab right in the “Basic Wireless Settings” category:

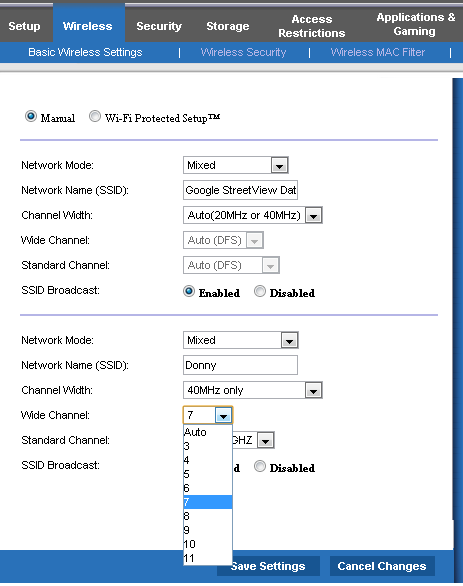
Pick the channel that is not (or barely) used in your area. In my example, I choose channel 10. Reconnect all your devices and see if you’ve got better speed or if you’re reliability issues are fixed!
That was part 1 – look out for part 2 that’ll show you even more in-depth tricks to improve your wireless network speed!

12 ways to boost your router’s security

hns2aWith the increasing number of network security breaches, we need to improve awareness regarding the security of your home network.

We simply need to follow some rules to control and prevent system penetration and also bandwidth theft (and losing money!). Safeguard your valuable information available through your home wireless connection and do not be easy target for hackers!

Here are 12 ways to boost your router’s security:

  1. 1. Install your router in a safe place where the wireless signal is available only inside your own house. Avoid placing it near to a window.
  2. 2. Turn off WPS, the automated network configuration method that makes your wireless password more vulnerable to hacker attacks.Turn on WPA2 encryption and, if you can, protect it with a strong password.
  3. 3. Change the default admin username and password to a strong password. Do not use default passwords because they’re generated from well-known algorithms that makes hacker attacks even easier. Do not use your name, date of birth, home address or any personal information as the password.
  4. 4. Upgrade your router firmware to fix known vulnerabilities of the router.
  5. 5. Don’t forget to log out after managing the router, avoiding abuse of the authenticated browser sessions.
  6. 6. Disable remote management of the router over the internet. In a business environment, if you need this management, it will be safer to use NAT rules allowing SSH or VPN access only.
  7. 7. To prevent CSRF attacks, don’t use the default IP ranges. Change the defaults 192.168.1.1 to something different like 10.8.9.7.
  8. 8. Prevent ROM-0 abuse (i.e., access to the secret data stored in your router: your ADSL login/password combination and WiFi password) of your router and forward port 80 on the router to and non-used IP address on your network. Check how-to here.
  9. 9. Set your router DNS servers to automatic mode (or DHCP) or for a static value that you manually set exactly according to your ISP.
  10. 10. Disable IPv6 on the router or, if you really need IPv6 services, replace the router with a IPv6 certified one.
  11. 11. You can save bandwidth and allow only specific computers or devices to access your WiFi even if they have the security key to enter. Find the computer MAC address (the “physical address” listed with the command line ipconfig/all at a cmd window). Into your router settings, you should look for the Mac filtering settings to add this identifier there.
  12. 12. Use a secure VPN in open/public WiFi hotspots. You can read more on how Avast SecureLine can protect PC, Mac and Android devices in these situations. If you cannot avoid using public WiFi, then try not to log in or enter your credentials (specially banking or credit card ones), but also your email and phone number. If you really need it, always prefer the secure protocol HTTPS (check the browser address bar).

Avast Software’s security applications for PC, Mac, and Android are trusted by more than 200-million people and businesses. Please follow us on FacebookTwitter and Google+.


How to disable IPv6 support in your router settings

Your WiFi network is not secured

Your WiFi network is not secured

After the previous articles you should be convinced that router vulnerabilities are one of the major concerns in network security. As you already know, the new Avast 2015 version includes a security feature called Home Network Security (HNS) which scans your network and router for vulnerabilities and prevent threats.

One serious problem occurs when when IPv6 (Internet Protocol version 6) is enabled (both by the ISP and on the router), but there is no IPv6 firewall being used. Which means that anyone on the Internet can access devices on the network (like printers, network disks, etc.). This is often the case because the routers are small, embedded devices that cannot handle IPv6 firewalling.

The main advantage of IPv6 over IPv4 is its larger address space: it allows 2128 or approximately 3.4×1038 addresses (or sites) which is an enormous number! In addition to offering more addresses, IPv6 also implements features not present in IPv4: it simplifies address assignment, network renumbering and packets processing.

In fact, a proper IPv6 firewall requires quite some processing power and RAM, so it’s no wonder that many of the cheap routers don’t have that functionality at all (or it’s not working properly).

The remediation is relatively simple: Just disable IPv6 on the router. In most cases, this shouldn’t have any impact on other services, unless they require IPv6 (in which case, it would be good to replace the router with something better which is IPv6 certified).

Avast Internet Security and Premium products offer full support to IPv6 for your computer on our silent firewall. Take into account that other devices, like network drives connected to the router won’t be protected.


Avast Software’s security applications for PC, Mac, and Android are trusted by more than 200-million people and businesses. Please follow us on FacebookTwitter and Google+.


Replace pre-installed antivirus on your Black Friday laptop

Black Friday laptop

Most people replace pre-installed antivirus programs with Avast Antivirus.

Black Friday and Cyber Monday abound with deals on laptops. When you purchase a new laptop one of the first things you should do is make sure that it is secure with your choice of antivirus protection.

You will probably find that antivirus is already pre-installed, for example, Windows Defender is built into devices that use Windows 8 and Windows 8.1. Among Windows 7 users, Microsoft Security Essentials is on most devices. When users change antivirus protection, the top product enabled is, you guessed it, Avast Free Antivirus.

You should replace Microsoft Security Essentials

Initial praise for the software (MSE) has turned to disappointment and it’s now clear that a third-party antivirus remains the best pick even for users who don’t want to pay,

wrote Matt Smith in a makeuseof.com article called Why You Should Replace Microsoft Security Essentials With A Proper Antivirus. Mr. Smith recommends Avast Free Antivirus.

Same goes for Windows Defender.

If you’re relying solely on Windows Defender for your antivirus protection, you’re anything but defended,

wrote Jill Scharr for Tom’s Guide.

Out with the old, in with the new

We strongly recommend to uninstall previously installed antivirus applications before installing Avast Antivirus on your computer. You can find a list of vendors, from A to Z, that provide a special removal tool to uninstall their antivirus software on our FAQ page. We recommend you follow their instructions before proceeding with the uninstallation.

Avast is most trusted worldwide

For the second year, Avast Free Antivirus has taken first place in the Worldwide Antivirus Product Market Share as measured by OPSWAT. With 220 million people, mobile devices, and computers protected by our security applications, Avast is the most trusted mobile and PC security in the world.

Avast Software’s security applications for PC, Mac, and Android are trusted by more than 200-million people and businesses. Please follow us on Facebook, Twitter and Google+.

How to change your router DNS settings and avoid hijacking

If your home router is hacked, you have a serious situation on your hands.

When an Avast Home Network Security scan finds that your router is already compromised, this notification will appear.

Your WiFi network is not secured

Your WiFi network is not secured

This means that the router has been hacked and the DNS settings have been modified to serve hacked contents to a cyberthief. This is a pretty serious situation. When hackers exploit router vulnerabilities, gain access to it, and modify the DNS servers settings, all your Internet traffic can be forwarded to rogue servers. This is called a man-in-the-middle attack.

The DNS or Domain Name System, is the “phone book” of the Internet, and an IP address is what’s listed in the book. DNS names computers, services, or any resource connected to the Internet or a private network. It translates easily memorized domain names, for instance, www.example.com, to the unique numerical IP addresses needed to locate the service worldwide.

What happens when your router is hacked?

Instead of connecting to a clean site or service, when your router is hacked, you’ll visit a rogue and hacked one. It’s obvious that your privacy will be violated, and your banking information could be captured – by the man-in-the-middle mentioned above. Even the usually secure SSL, the HTTPS protocol we have all been instructed to look for to indicate a secure site, won’t assure you’re protected. Instead, you’ll be proxied through malicious servers and the encrypted connection is cut in the middle. This illustration shows what happens.


Your WiFi network is not secured

Source: http://www.cert.pl//news/8019/langswitch_lang/en

This could also happen if your router is set to default/weak/factory password. So, the worst scenario of hacking is not that uncommon. See the latest news about webcams being hacked because of the owner’s using default passwords. Vincent Steckler, CEO of Avast, told VentureBeat that consumers are notorious for not updating default passwords, just as I’m talking about here. Some 63 percent of wireless routers run with default passwords, says Steckler.

The problem goes further than just one user or one device. The malicious effects can spread to all users in the local network, regardless of the operating system used.

How to protect ourselves against this plague?

First, scan your home network with Avast Home Network Security to verify if your device is compromised. If Avast alerts you, it’s already too late. You’ve already been compromised. You need to manually check the DNS servers in the router configuration.

By default, your router uses DNS servers automatically acquired from your Internet provider. All the devices on your network — PCs, smartphones, tablets, game consoles, and anything else connected to the network — get their DNS server from the router. You can change the DNS server on your router, therefore changing every other device on your network.

There are several good articles on the Internet about changing your DNS. Here’s one from howtogeek.com.

You also need to pay attention to your browser address bar. The HTTPS indicator should be there all the time. If it comes and goes, you may have already been compromised. In these cases, or for any other strange symptom you could be experiencing: Disable your Internet connection immediately and change the router username and password to unique ones (consult the router manual for instructions).

But, be warned, neither of these will be enough because if the router is vulnerable, it will take the attacker no time to change the settings back. Updating the router firmware or even changing it completely – as described in previous article – will be necessary.

Avast Software’s security applications for PC, Mac, and Android are trusted by more than 200-million people and businesses. Please follow us on Facebook, Twitter and Google+.


Keep track of your family’s devices using your Avast Account

The average US family owns four mobile devices, plus Internet-connected computers and other devices. Your Avast Account helps you manage their security.

Avast Account screenshot

Manage all your devices with a free Avast Account.

Keeping your security software up-to-date on all of these devices can quickly get confusing, and with today’s risks you want to make sure everything has adequate protection. Your Avast Account can simplify that task greatly.

Here’s what you get with an Avast account

Management made easy

  • Register any Avast free product which you have installed and which requires registration.
  • Manage multiple Avast-protected devices (PC, smartphone, tablet) from one place.
  • Remotely control Android mobile devices with Avast Mobile Security and Avast Anti-Theft installed. This is especially useful in case of loss or theft of the device .

Information at your fingertips

You can find information about your connected devices.

  • License status
  • Expiration date
  • Basic statistics
  • Version of virus signature database
  • Logs of activities, and more

Earn Avast Reward points for free stuff

You can generate your own special Avast Free Antivirus link to give to your family members and friends. When they download their own protection using your link, you collect “Karma” points to earn a free copy of Avast Internet Security. In your Avast Account, you can see how many points you have, earn badges and even see how you’re doing compared to other users.

Give Avast feedback

We provide links to the Avast Community Forum where you can ask questions of our experienced “evangelists,” and the Feedback page, where you can give suggestions, report a problem, or just say thanks.

Secure your Facebook profile

You can secure your Facebook profile using Avast Social Media Security. We help you navigate thorough the frequently changing security and privacy settings in Facebook. In the future we plan to add security profiles on other social networks.

How do I get an Avast Account?

New registrations of Avast Free Antivirus will automatically create an Avast Account and connect your device automatically. Visit https://my.avast.com or click Account in the Avast user interface. Use of the Avast Account for accessing other Avast services is completely optional.

NOTE: It’s especially useful to connect any mobile devices that have Avast Mobile Security installed because it gives you remote control over your device if the device is stolen. These remote control features have not yet been implemented for PC or Mac devices, therefore if you are not interested in the activity log or other information, you don’t have to connect your device to your Avast Account at all.

When you do connect your device, please be patient because of the large amount of data we have to process; the device status isn’t updated in real-time. It could take up to a half hour before the actual security status and other device information appears on the devices page, so check again later.

Avast Software’s security applications for PC, Mac, and Android are trusted by more than 200-million people and businesses. Please follow us on Facebook, Twitter and Google+.