Tag Archives: Product

Grab the new AVG Cleaner for Mac

Just as Windows and all applications tend to collect temporary files, log and so called “cache” files in order to function properly, so do applications on your iMac, MacBook or Mac Mini – and in many cases they leave those files behind.

AVG is happy to announce a brand-new version of AVG Cleaner for Mac, which helps remove leftover files from your Mac. Click here to download it right away!

AVG Cleaner for Mac


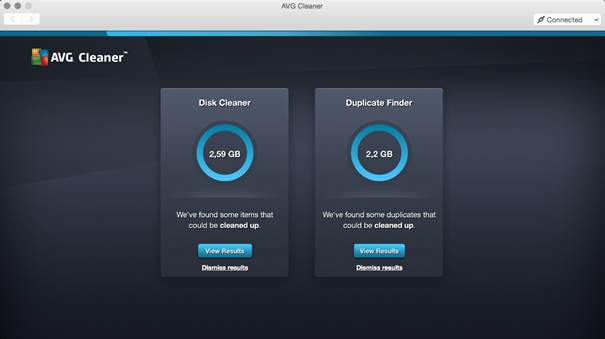
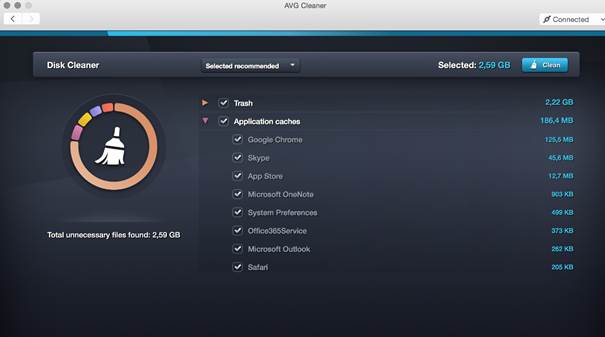
AVG Cleaner for Mac analyzes invisible data trash and unwanted duplicate files that gather on Mac computers through everyday usage, helping to disk space for storing precious photos, music and other important files. The new Cleaner for Mac app sports a new user interface, too, which helps makes the cleaning easier. Here’s what we actually help you remove:

  • NEW iPhoto Cache: iPhoto creates its own “cache” folders, which help speed up the viewing of photos, which takes up more and more space. Also, our users reported to us that they experienced problems with deleting photos which is directly tied to the iPhoto cache, which is why we decided to implement that cleaning mechanism.
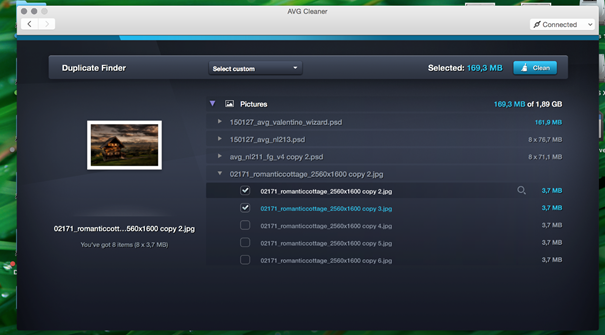
  • Forgotten duplicate files: Viewing, copying and editing files could result in duplicate music,photos, videos and documents
  • Uninstall leftovers: Even if an application has been uninstalled, unneeded cache files may remain
  • Download folder: Many old unneeded files including setup files, videos, pictures and documents may end up in the OS X download folder
  • Browser cache: Safari®, Chrome®, and Firefox® browsers store non critical temporary cache files and cookies in a cache folder. Deleting this cache not onl frees up drive space but can hel protect privacy
  • Crash files and logs: Update logs and crash reports are created automatically by both Mac OS and 3rd party applications. This data is not critical and can waste lot of drive space.

AVG Cleaner for Mac Disk Cleaner

AVG Cleaner for Mac Duplicate Finder


What’s New in AVG PC TuneUp?

In our last blog post, we’ve shown you our new killer feature for cleaner for AVG PC TuneUp, which is part of our all-new AVG Performance 2015 package. But that’s not all. AVG PC TuneUp also got an all-new Disk Cleaner which removes even more clutter from your Windows PC, laptop, and ultrabook:

Improved AVG Disk Cleaner

Our new “AVG Disk Cleaner” includes significant new and improved cleaning definitions to help remove the wasteful files of 39 additional programs.

This year we’re cleaning out unneeded files from:

  • Origin & Steam
    Wasteful log files & telemetry data hidden within the two gaming platforms.
  • Windows®
    We’re now cleaning even more temporary files, caches, log files, and leftover 8.1 Apps cookies from all built-in Windows 8 apps.
  • Skypeâ„¢
    Cache files, temp files and backup installation files from Skype.
  • All Cyberlink® products
    Leftover log files, temp files, trace files and also backup installer files from more than 25 Cyberlink products, such as Cyberlink® PowerDVD.
  • Apple® software
    Unfinished and broken downloads, such as videos or music, from iTunes (on Windows) and many locations in which Apple products, such as QuickTime or the iCloud client store backup installation files and updates, which are no longer necessary once they were installed.
  • nVidia, ATI and Intel
    Leftover data that gets created by installing and running Intel, AMD and nVidia software drivers, such as cache files for nVidia Shadowplay.
  • Windows UAC
    In order to protect Windows and users data from harm, the User Account Control (UAC) redirects files from programs which require administration rights, such as older Windows XP programs. AVG Disk Cleaner remove wasteful files that were created by these older applications.
  • Windows Upgrade Files
    All leftover files from when a user has upgraded to a newer version, such as Windows 7 to Windows 8.1 right within the new category:

  • Screenshots
    This new Disk Cleaner category shows screenshots that an application or the user has takenwithin applications such as BS Player or VLC
  • Flash and Java
    In addition to cleaning Flash and Java cookies, AVG Disk Cleaner now cleans temp files leftover temporary data, too.


In addition to that, we now clean up leftover data and improved existing cleaning algorithms from the following applications: Multiple Ashampoo programs, Avira, Amsn, Ad-aware, Auslogic programs, Audials tunebite, AIMP, Avast software, BS player, CleanMyPC, Comodo programs (CertSentry, PaintShop, VideoStudio), Cyberlink programs (PowerCinema, YouCam, Downloader), CleanMyPC Registry Cleaner, Drivermax, Google Talk, IMVU, Java, Jukebox, Jdownloader, Microsoft Office, Nero Programs, Norton antivirus, Picasa, Roxio, Starmoney, Skype, Spybot search and destroy, Ultraedit, WPFFont, Yahoo! Messenger, ACDSee, Adobe Photoshop, Adobe Lightroom, Corel AfterShot Pro, Corel PaintShop Pro, GIMP, Google Nik Collection, Paint.NET, PhotoPad, Photomatix, Snagit, Zoner Photo Studio


Step by Step: Here’s How You Clean Up

  1. Download and install AVG PC TuneUp trial version here. Finished? Then move on to the “Cleaning” category. AVG PC TuneUp now scans your entire hard disk for invisible data crud:

Example: On this 6 year old desktop PC, we found 68 GByte of worthless data!


  1. To open AVG Disk Cleaner, click on “Clean up Windows and programs”. You should find a list of things you may not need:

Note that AVG PC TuneUp doesn’t delete any files that are actively used by any of your programs – so  your precious files should not go missing. However, it may be worth going through the list and looking at the help pane on the right to confirm that you really don’t need any of these files.
Ok that’s it for now: Have you tried it out? Let us know how much you were able to clean up on your PC with the new AVG PC TuneUp.

The Ultimate ‘Alien Isolation’ Performance Guide

Once Alien Isolation got announced a few months ago, I immediately went back and rewatched the 1970s Ridley Scott classic movie “Alien”. No AlienS, no Alien 3, no Alien 4. The plain old Alien! And it still holds up as one of the scariest sci-fi movies ever, dealing with the struggle of one women versus one alien.

With the blockbuster game, Alien Isolation, by Sega and The Creative Assembly, that very spirit of one versus one is back big time. Set 15 years after the events of Alien you play Amanda Ripley, the daughter of famous alien hunter Ellen Ripler from the movie. And while it’s set in probably the most beautiful graphics out there right now, it mimics the 1970s wonderfully:

Alien Isolation

It’s all about cassette decks, monochrome monitors, and wonderful sci-fi furniture art of that decade.

However, you need a fairly powerful system to run Alien Isolation but – lucky you – we’ve played the game over the course of the past couple of days and found ways to improve the performance of the game and even unlock some hidden features to make it run significantly faster on slower PCs. Here’s how:


#1 – Basic PCs and Laptops

Before you start tweaking performance settings for Alien: Isolation, I recommend that you follow the 9 essential steps to boost your PC or laptop speed that I published a while ago. This covers the basic steps to get your machine in top shape, including how to:

  • Upgrade your graphics drivers and even use beta drivers
  • Overclock your graphics card (safely!)
  • Use our AVG Zen Performance to turn off all performance-sapping background activity
  • Defrag your hard disk
  • …and more!

As Alien Isoluation takes its toll on your hardware, you got to be sure that it’s tweaked to its absolute limit before you jump into the game-specific settings.


#2 – Enhanced 2k/4k/8k and Level of Detail

Gamers have immediately found a way to increase the visual quality of the game greatly by increasing both the level of detail level beyond what’s possible in the “in game” settings menu as well increase the resolution of the shadows. Now instead of using shadows with a 1k resolution, they managed to crank that up to 2k, 4k or even 8k resolution.

We’ve done the tests and the visuals are noticeably better. Click on the before and after images:

Before:

Alien Isolation

After:

Alien Isolation

It’s relatelively easy to see the difference between the shots: the shadows appear much crisper and clearer. However, while it’s easy to see in bright spots, it’s relatively tough to differentiate in other more darker scenes. We noticed a drop of 20% in performance, though that was on a relatively “weak” mobile GeForce 650M. If you feel it’s worth the drop, it should be enabled.

All you have to do is download the tweaked “ENGINE_SETTINGS.XML” from this page. Put the XML file right in your Alien Isolations “Alien IsolationDATA” folder and overwrite the existing file with it. For example, if you purchased the game on steam, the file sits under: C:Program Files (x86)SteamSteamAppscommonAlien IsolationDATA

To enable the setting, launch the game and go to “OptionsVideo”. Make sure to set the “Shadow Map Resolution” to “8K”.


Alien Isolation


#3 – Enhance Reflections

Another great addition that comes with the enhanced engine file (see #2) are enhanced reflections that the developers turned off. Now while these may look significantly “nicer”, they also have a shiny look to them which some gamers feel disturb the overall atmosphere of the game:

Before

Alien Isolation

After

Alien Isolation


Source:
Steam Community

To enable it, you set the “Planar Reflections” to “Alternative” – see how you like it. If you want to go back, you can always set it to “On” (which is the game’s default setting). In my tests I noticed no drop in performance whatsoever with the reflections enabled or disabled.


#4 – Increase the Level of Details for Distant Objects

Some objects tend to pop up out of nowhere. In order to prevent this rather annoying (and tension breaking) effect, you should increase the level of detail for distant objects. This, too, can be done by applying the hacked file (#2) and enabling it under the “Level of Details” – simple go for the “Ultra” setting once you’ve enabled the tweak!


#5 – Skip the Videos

The introduction videos are somewhat annoying and they can’t be skipped at a push of a button. Here’s how to get rid of them. Simple solution: Delete them! Here’s how: Navigate to your Alien Isolations “DATAUIMOVIES” and delete or rename the files “AMD_IDENT.USM”, “FOX_IDENT.USM” and “CA_IDENT.USM”.

Alien Isolation


#6 – Get Smoother Mouse Movements

We’ve talked about VSync in the past and it still holds true, especially with Alien Isolation. With the vertical synchronization turned on you may get some delays. That’s why we recommend turning it off either completely using the in-game setting or via the NVIDIA or ATI control panel:

NVIDIA: To get to the NVIDIA Control Panel, right-click on your desktop, select “NVIDIA Control Panel” and head over to the “Manage 3D Settings” category on the left. Go to Maximum Pre-Rendered Frames first: This controls the number of frames that the processor prepares before transferring them to the graphics card. Increasing this value results in smoother game play, but you may notice a lag when using the mouse and keyboard. To eliminate the lag, try the “1″ setting. Next, move over to VSync: It synchronizes the frames that your graphics card renders with the refresh rate of your monitor. If you disable it, you will notice that Alien Isolation may not lag as much or not at all anymore.

ATI/AMD: You’ll find the Wait for Vertical Refresh feature in your 3D settings control panel. Disable Vsync for Alien Isolation and you may find it to run smoother.

Alien Isolation


#7 – Fix Your SLI RIG (Nvidia)

Got yourself a gaming rig with two (or more) graphics cards? Then you may in for a negative surprise as Alien: Isolation could completely crash on you at any moment or run even slower than with a single GPU. Here’s how to solve the problem: Download nVidia Inspector from this place and run the tool. Go to the SLI Compatibility form and change it to x080912F5. Done.


#8 – Enjoy!

As I’ve been super-busy as of late I couldn’t really play more than a few hours but I can tell you that the enhanced graphics tweaks really made the game more immersive and enjoyable. Now I can’t wait for the weekend to hit so I can crawl under a blanket, light up a candle and get hunted down by an Alien.


Zen Performance


Cleaning Up Your Right Click Menu

In this blog post, we’ll show you how to easily clean up your context menu in no time. It requires a little bit of tinkering with Windows, but if you follow our instructions you’ll find it easy to follow. Let’s do it:

All entries that show up under your “Right-click menu” or “Context menu” are stored in a rather secret location, called the Windows registry. Here’s how to open it:

  • Hold down the “WINDOWS” key on your keyboard and then press the “R” button. This will bring up the following screen:
Command Menu

  • Type in “regedit” and hit Enter.


I recommend creating a back up before making any changes


  • To create a backup, simply click on “FileExport” and type in the file name.
  • Next, open the following folders: HKEY_CLASSES_ROOT*shellexContextMenuHandlers. All the folders you see below represent entries in the right-click menu:


OK, let’s move on to actually getting rid of that folder. So, for example, the “AVG Shredder Shell Extension” folder represents the following item:If you like to get rid of it, simply delete that entire “Folder”.

  • In this example, I want to get rid of the entry for a nice desktop organization tool called “Fences” that I use a lot. Click on “FencesShellExt” (don’t touch the OpenWith or WorkFolders entries, though!) and hit the “Delete” key on my keyboard.


Now, once I cleaned it up, my context menu looks very clean:Plus, you may even be able to solve problems related to the context menus and delays when working with files.


Pro Tip:

If you’d like to add or remove items in your “Create New…” menu there’s a great (and much easier) solution for you. All you need is AVG PC TuneUp:

  • Once installed, go to “Personalize” and click on the “Personalize and behaviors”.
  • Head over to “File Types” and “New”
  • In this area you can easily get rid (or even add!) items that appear under the “New” menu, which I personally like to keep very clean as I only create a few files that way.


Got any questions? Let us know!


Cleaning Up Your Right-Click Menu

Does it take several seconds for the right click menu (called the “context menu”) to load when you right-click on a file, a folder or even just the desktop?

Are you tired of looking at completely overblown context menus like this:

2014-10-07_04-10-57

Then it’s time to clean up!

In this blog post, we’ll show you how to easily clean up your context menu in no time. It requires a little bit of tinkering with Windows, but if you follow our instructions you’ll find it easy to follow. Let’s do it:

    1. All entries that show up under your “Right-click menu” or “Context menu” are stored in a rather secret location, called the Windows registry. Here’s how to open it: Hold down the “WINDOWS” key on your keyboard and then press the “R” button. This will bring up the following screen:
      2014-10-04_19-09-45
      Type in “regedit” and hit Enter.


    1. Before we make any changes, I strongly recommend you perform a backup of the entire folder structure so you can go back to the original menus any time you want. To do that, simply click on “FileExport” and type in the file name.


  1. Next, open the following folders: HKEY_CLASSES_ROOT*shellexContextMenuHandlers. All the folders you see below represent entries in the right-click menu:
    2014-10-04_19-11-21
  2. Ok, let’s move on to actually getting rid of that folder. So, for example, the “AVG Shredder Shell Extension” folder represents the following item:If you like to get rid of it, simply delete that entire “Folder”. So for example, I wanted to get rid of the entry for a nice desktop organization tool called “Fences” that I use a lot:So I click on “FencesShellExt” (don’t tough the OpenWith or WorkFolders entries, though!) and hit the “Delete” key on my keyboard. Now, once I cleaned it up, my context menu looks very clean:2014-10-07_06-36-04Plus, you may even be able to solve problems related to the context menus and delays when working with files.


Pro Tip:

If you’d like to add or remove items in your “Create New…” menu there’s a great (and much easier) solution for you. All you need is AVG PC TuneUp (you can get the trial here: http://www.avg.com/us-en/avg-pctuneup):

Once installed, go to “Personalize” and click on the “Personalize and behaviors”.   Head over to “File Types” and “New”:In this are you can easily get rid (or even add!) items that appear under the “New” menu, which I personally like to keep very clean as I only create a few files that way:

2014-10-07_06-45-46

Got any questions? Let us know!

How to switch to AVG antivirus

Sometimes changing your security software can seem like a daunting and complicated task, especially if you’re not familiar with removing programs from your computer. There are many things to remember and check. It doesn’t always need to be complicated though, if you want to protect your Windows PC with AVG’s award winning security software, there are just a few steps you need to take to make sure it goes to plan.

Follow these five tips to help you avoid any complications when switching to AVG’s security software and have a hassle free experience:

Check your system specifications:

With any installation, you should check that your PC meets the minimum requirements for the software. This will ensure that it is compatible with your machine and that you have enough space and power to run it properly.

Action: You can find AVG’s requirements here: What are AVG system requirements and supported operating systems.


Ensure your system is up to date:

Security software can make alterations to your operating system, so it’s important to check that you are running the most current version of Windows. This will help prevent issues when AVG has to make changes to any system files.

Action:  Visit the Microsoft Windows Update page to make sure that you are running the most up to date version of Windows.


Remove other security software:

Before installing AVG security software, it’s important to check that you have removed any existing protection. It’s quite common for multiple installations of security software to conflict as they can both alter you system at the same time and also degrade performance.

Action: If you are having difficulty removing any existing security software, check out this How to remove conflicting anti-virus products article.


Check you are logged in as Administrator:

In order for AVG to install properly, it needs to be done by the system administrator. This will ensure that the AVG installer has access to all the files necessary for it to complete successfully.

Action: Read this How to check if I’m using an administrative account article to sure you are logged into Windows as an Administrator.


Install the latest version of AVG:

Whether you are reinstalling AVG or installing it for the first time, it is important to check that you are installing the latest version of our security software.

Action: For instructions on how to install the latest version of AVG, visit the How to download and install AVG article.

Tip: If you happen to experience any issues during installation, please refer to the article What to do when AVG installation is failing for help.Â